A Transparent Engine for Flow and Combustion Visualization Studies
40 Nutmeg Lane
Glastonbury, CT 06033
Abstract
A single-cylinder research engine for flow and combustion visualization has been designed, built, and operated. It has a transparent liner and piston top window that maximize optical access for inspecting in-cylinder flow and combustion. It is an overhead cam engine with a three valve head, nominal 9:1 compression ratio, 92 mm bore and stroke, and maximum speed of 4000 r/min. The engine design is described in detail and some preliminary results are given. The unique structural and thermal design is currently being tested with a metal liner before the engine is fired using a single crystal sapphire liner.
PURPOSE OF THE RESEARCH
The goal of this project is to provide a research engine for the investigation of the flow and combustion processes that occur inside the cylinder of a typical modern automobile engine. The geometry and operating parameters of such an engine are accurately reproduced in the test engine.
The test engine is designed to have a transparent cylinder wall and piston top. This optical access will be used to diagnose the flow and flame behavior in the cylinder, which, in turn, will be related to engine parameters to improve overall combustion processes and engine output.
SUMMARY
A single-cylinder research engine for flow and combustion visualization has been designed, built, and operated. The engine maximizes optical access to the cylinder by using a transparent liner and a window in the top of an extended piston. It is an overhead cam engine with a three valve head, a nominal 9:1 compression ratio, 92 mm bore and stroke, and maximum speed of 4000 r/min. Quartz has been used extensively for motoring operation tests, and a stainless steel liner is being used to test the thermal behavior of the firing engine design before the single-crystal sapphire liner is used.
The design of the engine is described after a brief survey of visualization engine work. Most of the engineering constraints arise from the implications of using a sapphire liner. The liner is thermally insulated and operated hot (300-5000°C) and the piston is cooled by graphite wipers to reduce thermal gradients in the wall and consequent thermal stresses. Other liner materials can be used for motoring operation.
Sapphire is the only liner material that is strong enough for sustained firing operation and its properties are discussed. The sapphire has been processed by extremely fine polishing and applying a glass glaze to the outside. The glaze should increase the mechanical design strength of the sapphire by preventing surface flaws that lead to cracks and failure. The mechanical and thermal stresses of the sapphire are described in the context of typical firing operation. Thermal stresses in the sapphire are the dominating problem in the entire engine design. The important facets of engine assembly, operation, and instrumentation are described. The work is concluded by a general discussion of the engine, its capabilities, and current results.
INTRODUCTION
The physical processes that occur in the cylinder of an internal combustion engine are as complex as they are important for the resulting power and emissions produced by the engine. At the present time the models used to connect the physical geometry of the engine to its output are basically phenomenological.
Diagnosing in-cylinder engine processes is a difficult task because the conditions there are both hostile to measurement and easy to disturb. The processes are delicate because of the relatively small volume involved and the interactive and highly three-dimensional nature of the flow. For these reasons optical diagnostics are attractive techniques; they are becoming a popular way of examining the details of engine flow and combustion.
In the developing understanding of these flows, many parameters depend in detail on the instantaneous or average three-dimensional flow field. Point and planar measurements are not adequate to derive this flow field due to its inherent complexity and/or rapid variation. In order to use optical techniques to measure the whole flow field, it is necessary to have optical access throughout the volume of the cylinder. Furthermore, an engine with such access must retain the characteristics typical of real engines to remain a valid research tool.
This work describes a dedicated engine facility that achieves these goals.
SURVEY OF ENGINE OPTICAL ACCESS
Transparent engines are familiar to most of us through their use as an illustration of the motion and construction of the mechanical components of an internal combustion engine. The design constraints for such an engine are mild; only structural rigidity, and sliding where necessary.
The history of engines built for the purpose of optical access is long and involved, and many design techniques have been used. Unfortunately, in the past, materials constraints have limited this work in one way or another. In order to install optical access in an existing engine, either that access had to be restricted, or the engine had to be modified to ease the demands on the transparent material that was used. For this reason efforts have been of limited scope or not obviously relevant to real engine processes. An overview of the approaches that have been taken is thus more profitable than examining the historical development of the field. References are given as examples and are not meant to be complete.
The largest category of optical access in engines is the use of flat windows. Many experimenters have added small windows to existing engines for point measurements or to introduce an external light source (for example [1]). The most common use of a window that is of a dimension comparable to the cylinder size is as a substitute for the top of the piston [2]. In this case the piston is built as two parts: an oil control segment in the crankcase, connected to an encased window by a cutout section. A fixed mirror is mounted in the cutout while the top and bottom of the piston oscillate above and below it. This allows viewing up through the piston-top while the engine is running. Such a window is especially useful for examining events at top-dead-center (TDC) when the piston will normally cover other windows.
The other major use of large flat windows is as the top of the chamber. This has been done for two-stroke [3] and four-stroke engines [4,5,6] * Engines with these windows must move the normal features in the head to the sides of the engine. The simplest case is the four-stroke where only the spark plug must be moved, since porting of gases is done through the cylinder side wall. The four stroke work is done with an "L-head" configuration; the valves are mounted beside the cylinder and the flow ducted into the cylinder. The flows in such engines are unique to the configuration, although the processes are in some respect similar to a real engine in that there is turbulent combustion above a moving piston.
In an extreme case of modifying an engine to be compatible with flat windows, engines have been built with a square bore. The cylinder cross-section is square and the cylinder side walls are made with up to four flat windows. In one case a single-cylinder research engine was built with this configuration [7]. In another, a one-stroke rapid compression machine was built [8]. Both of these machines were used to visualize flow throughout the cylinder. The flow in this geometry is considerably different than that in a cylindrical geometry; again relevance is not obvious.
One sideline of optical access is the use of very small windows coupled with fiberoptics or borescopes. Borescopes use miniature optics to provide internal views through small apertures. Used mostly for medical work, these devices are usually limited by the light needed by the low f-number optics.
Another separate area of visualization work is the use of model engines. These engines all have reduced operating parameters in some respect. Quartz becomes a viable alternative as the combustion chamber wall if the internal pressure is reduced. This can be done in a number of ways, including lowering the compression ratio, rotational speed, or fuel heat release. Another option is simply to reduce the size of the entire engine. One example of a model engine that approaches real engine parameters is associated with work done at Imperial College [9,10,11]. Once again the work, although valuable, must be verified ina real engine.
There are techniques that can be used to reduce the engineering demands on an engine while retaining appropriate parameters. Once again the goal is to make a transparent cylinder wall (liner). Such devices are called similarity engines. They use a completely different fluid and change operating parameters so that the Reynolds number of the flow is identical to that of a real engine. One example [12] is the use of water. In this work the intake flow is reproduced in a plexiglas engine running at close to 100 r/min. Of course, only one stroke is modeled, and some secondary parameters such as Kolmogorov length scale are not reproduced. Another case is the use of a freon based gas in a similarity engine [13,14,15]. This apparatus accurately models all of the processes of the intake stroke as well as compression.
Transparent liners can be made for motoring realistic engine if some care is taken. The difficulty there is more the expense than the engineering feasibility. Inexpensive liners can be made from glass tubing, but the engine bore must be an english standard dimension. Plastic can also be used if engine operating times are short enough so that compression and ring-friction heating do not become severe. Firing engines are too extreme an environment for these materials except in the case of an axially thin slice window.
Full operation including firing and realistic parameters can be achieved by using single crystal sapphire as a liner material. This design was developed at Stanford [16], where a full analysis of the material in an engine environment was explored. Unfortunately, the safety factor for its use in that particular engine is low for firing operation, and due to inaccuracy for some parameter values or unusual but not impossible operating conditions, the calculations indicate that the liner might fail. This material is so expensive that firing has not been worth the risk up to this time. Another such engine was built with slightly different characteristics [17], and for similar reasons could only be used for motoring experiments.
DESIGN OVERVIEW
Introduction. The essence of the problem of diagnosing the flow and combustion in an internal combustion engine is the need to measure important parameters throughout the chamber simultaneously. Such volume diagnostics can only be done optically with access from many different directions. For a real automotive engine, the maximum possible practical optical access is obtained by using a transparent cylinder liner and a window at the top of an extended piston. Although the latter is a fairly standard feature of firing research engines, a cylindrical transparent liner for a firing engine has not been operated successfully at this time. The problem is that common transparent materials do not have the mechanical strength to survive combustion conditions. Primary among these conditions are the cylindrical geometry coupled with the non-steady high temperatures and pressures.
Novel design concepts are used in this work to achieve an acceptable safety factor for the firing operation of a transparent liner. Both thermal and mechanical stresses must be minimized, and the material must be made in a way to optimize its strength. Furthermore, structural supports must not interfere with the optical access made possible by the use of transparent components. Motored work can be done with a different material that can be substituted to minimize the possibility of damage to the firing liner.
Engine Parameters. The engine has been designed and built to accurately reflect the operation of a typical automobile engine. It can be operated at speeds up to 4000 r/min with a nominal compression ratio of 9:1. Two overhead cams drive an exhaust valve and two intake valves, and the pent-roof shaped head cavity contains two spark plugs, a configuration characteristic of more advanced head designs. The bore and stroke are 92.0 mm, which is in the middle of the range of bore/stroke ratios of engines built by current manufacturers. It is a single cylinder research engine, but balancing problems have been avoided by using two separate counter-rotating balancing shafts beneath the crankshaft. The engine has been operated with gasoline using standard port fuel injection. However, since various fuel vaporization, storage, and deposit problems serve only to detract from flow visualization, propane was used as the fuel for most measurements.
Design Considerations and Philosophy. The visualization engine has been designed to be a firing engine with both a transparent liner and piston-top. Although glass can be used as a flat piston-top window and a liner for motoring operation, for firing operation the liner must be made out of a stronger material. At this time a search of material properties shows that single crystal sapphire is the only substance that can survive extended firing operation.
Having accepted this conclusion, the engine design must be modified to be compatible with the special properties of sapphire. In particular, sapphire has large coefficients of both thermal conductivity and thermal expansion. This translates into severe thermal stresses and the need for the material to be able to expand; cooling is incompatible with optical access. The lack of cooling also implies that the liner must be thermally isolated to prevent large gradients along its length.
The overall design must also be simple, maximize optical access by minimizing structural obstructions, and be consistent with the demands of maintaining a high quality optical surface. In practical terms this last constraint means that the engine must be designed for a large number of assemblies and disassemblies; the process must be easy and not lessen the integrity or performance of the engine.
Special Design Techniques. A number of unusual design characteristics have been built into this visualization engine. As has been stated, most of these are a result of using a sapphire liner. These design features will be discussed in detail below, and can be grouped into three categories; thermal, structural, and operational.
Thermally, the engine is designed to operate with a hot liner. To operate a hot liner within a cooled structure, thermal insulators are built into the engine above and below the liner. The head and metal supports below the liner are all water-cooled. A special water cooling passage is incorporated into the head to compensate for close tolerances needed to support the insulated liner. Furthermore, in order to minimize thermal gradients through the cylinder wall, the piston is cooled by graphite wipers. Thus, after combustion, heat is drawn from the wall through the piston in the reverse of wall heat flow in engines. Temperature gradients in the wall can cause extreme stresses in the sapphire, so the thermal behavior of the sapphire has been analyzed in detail, leading to an optimum thickness that balances thermal and pressure stresses.
A liner operating at high temperature means that plastics and rubber cannot be used. This has various ramifications. The piston top window is mounted with metal C-rings instead of polymeric O-rings, graphite is used as the ring material, and macor insulates the liner. Expansion and contraction of the liner is absorbed in a structure that maintains a constant vertical sealing load with a floating pneumatic support.
Structurally the engine is held together by thin columnar supports. These rods are set away from the liner and made of special high-strength steel that permits them to be very thin.
To enhance the strength of the sapphire liner the outside is given the best polish possible and then glazed with a glass overcoat to protect the surface. Both of these processes remove surface flaws that are responsible for the quoted strength of sapphire, and increase that strength by a significant amount. The engine is built with O-ring seals and few structural joints to allow easy and quick disassembly and assembly. It is also built in distinct segments that come apart as a whole to minimize the joints that must be handled during cleaning of the liner or other specific tasks. Techniques are developed and recorded for these jobs, making repetition simpler and faster.
DETAILED DESIGN
Introduction . The visualization engine combines the special design characteristics that have been outlined above with the maximum amount of standard and commercial hardware. Each component has constraints placed on it by both the specialized function of visualization and use as a realistic engine. The many interactions between these constraints lead to the final overall design. Because of these many factors, the important pieces of the system must be discussed in detail.
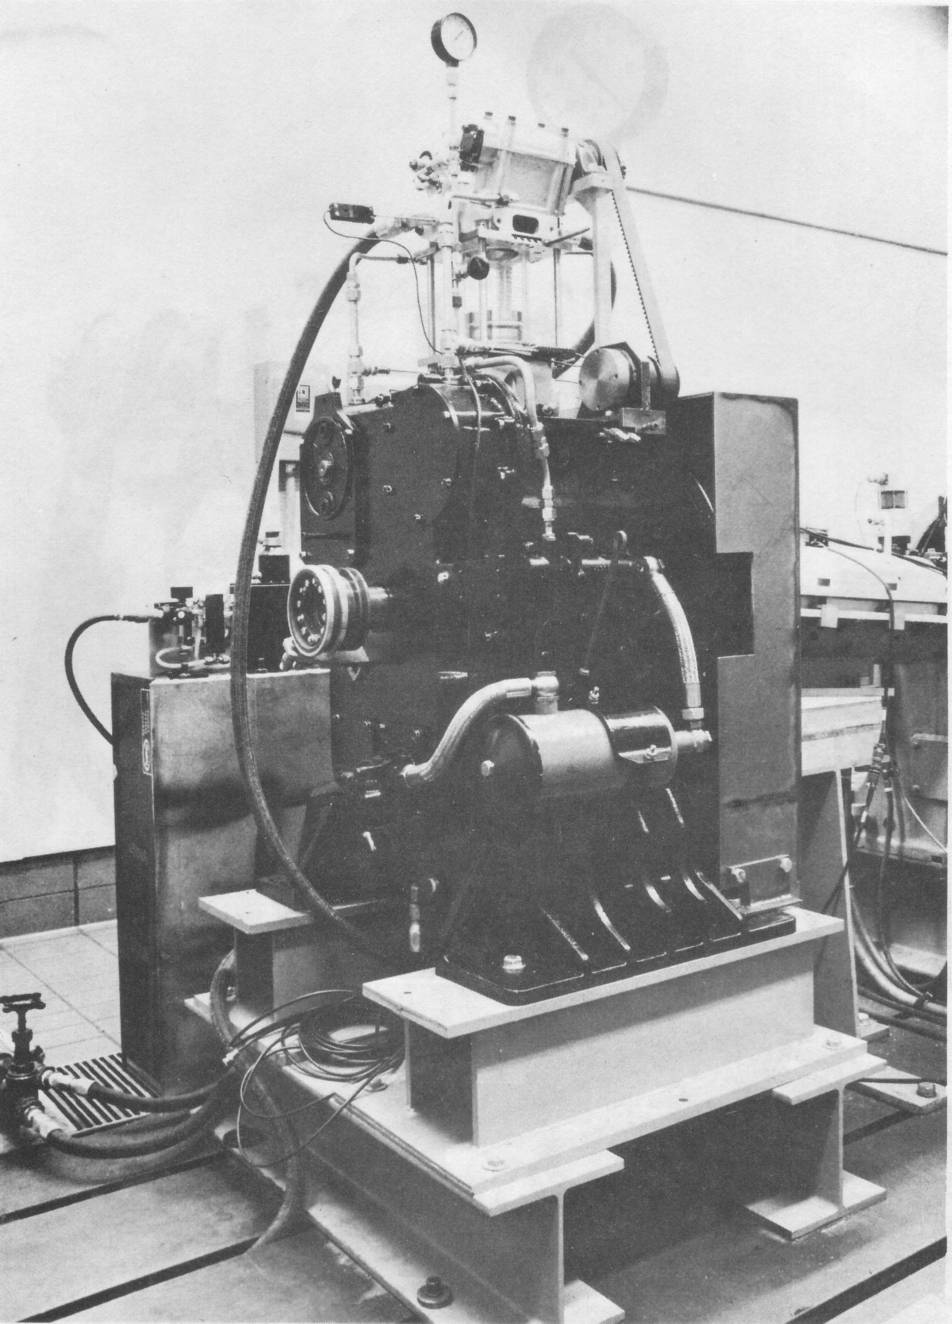
Figure 1. Visualization engine photograph.
Photographs of the engine are shown in Figures 1 and 2 as an overview of the design of the engine. Figure 1 shows the engine as a whole, and is dominated by the engine stand, flywheel guard, and crankcase. At the top can be seen the head with cam carriers and belt drive. Below that the piston is visible through the transparent liner. The large water cooling line for the head can be seen, as well as the smaller oil supply and drain lines. The exhaust port is shown in the head without the exhaust pipes attached.
Figure 2 shows in detail the engine construction above the crankcase. At the right the toothed camshaft drive belt is shown passing over one cam pulley and an idler pulley at the bottom right. It is driven from a pulley beyond and below the view shown here, by a shaft seen barely protruding from the crankcase on the lower left. The steel tubing is oil supply (valved line) and return for the camshafts. Through the circular hole below the liner can be seen the sidewall of the piston cutout. Normally a mirror is inserted here for viewing up through the piston window.
Overall Structure. The visualization engine design is driven by the need for both realistic engine operation and for optical access. Beyond this the practicality of the project implies that the number of specialized components should be minimized to decrease both the extra design and testing needed to achieve an operating engine.
For these reasons the Visualization Engine is built with a commercially available crankcase) a visualization shell that replaces the normal engine block, and a production head. These are connected together by
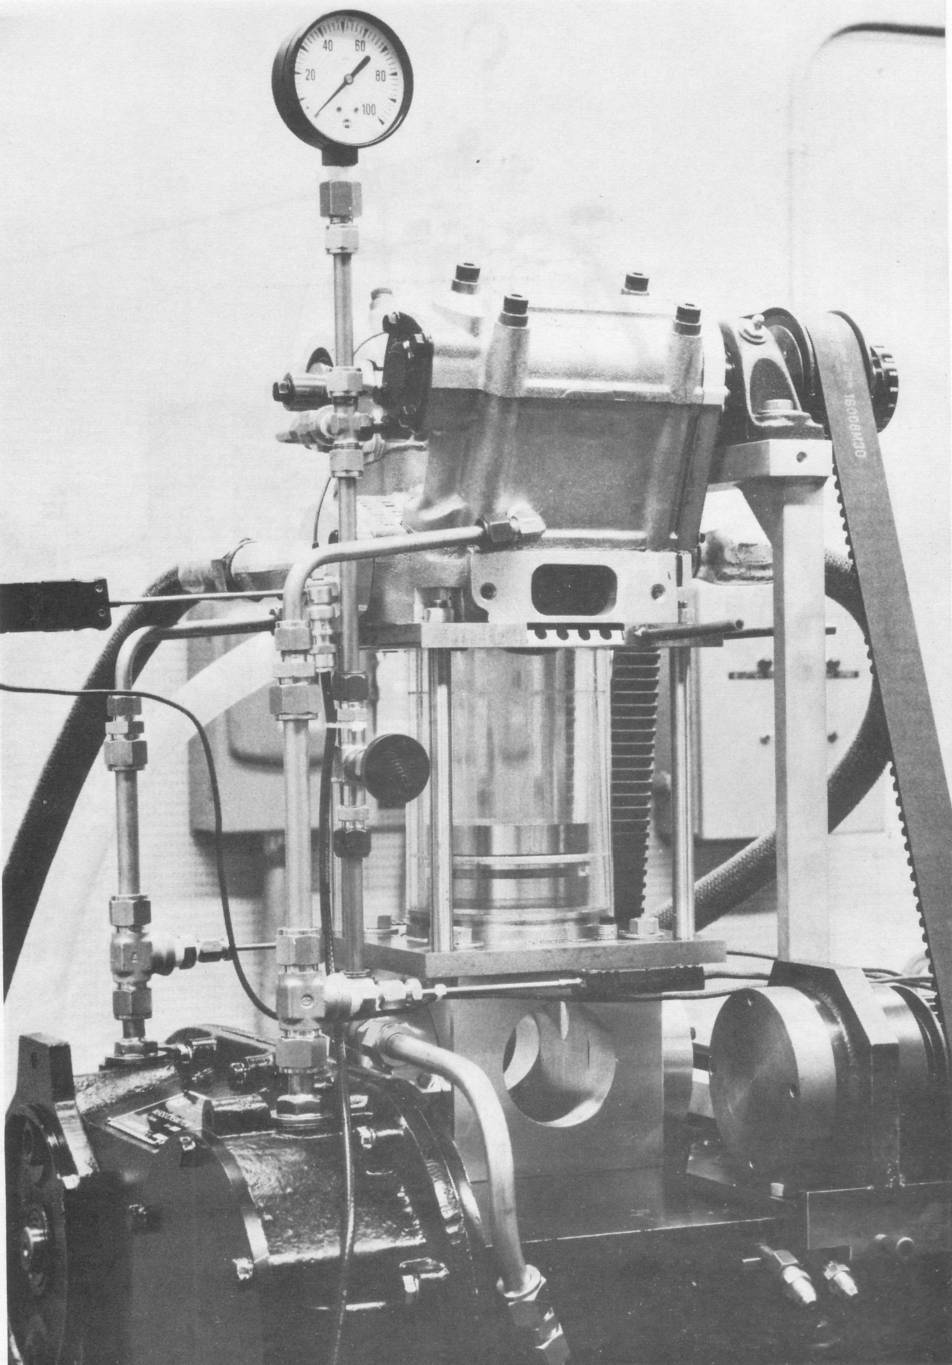
Figure 2. Engine Liner section - photograph.
an exterior post structure designed to support the loads generated by combustion. The head and shell are supplied with cooling and lubrication by external tubes, and the head camshafts are driven from the crankcase by a toothed belt and pulleys. The head, visualization section) lower piston ring section, and crankcase are all complete segments that can be separately assembled and disassembled.
Crankcase Design. The base of the visualization engine is the Model 502 crankcase sold commercially by the Austrian company AVL. The primary advantage of this crankcase over others currently sold is the feature of two extra and separate counter-rotating balancing shafts. These shafts have weights attached that are machined at engine assembly to exactly compensate for the imbalances that are inherent in single cylinder engines. Although the smaller version 503 is more often used, the extra piston mass associated with a window in an extended piston necessitates a balancing mass that will only fit in the larger crankcase crankcase cavity of the Model 502. The crankcase balancing shafts are gear driven on the front end by the crankshaft that also drives overhead camshafts through a similar gear.
The crankcase has a massive flywheel that permits very stable speeds but limits the safe speed to 4000 r/min. Other accessories come with the crankcase, but in normal operation only the oil pump is used to supply oil to the head. A shaft angle encoder is attached to an extension of the crankshaft through a flexible coupling to give real-time indication of crank position for experiment control and monitoring.
The crankshaft was machined at the factory to be consistent with a 191 mm long connecting rod from a 6.2 liter engine made by Detroit Diesel Allison Division. A long connecting rod was needed so that the entire extended piston was above the crankcase shelf. This permitted optics to be easily mounted in the piston cutout to see up through the piston window. Even with such a long connecting rod some of the lower oil containment section of the piston is set down below the crankcase shelf.
The crankshaft is bolted onto a standard dynamometer for motored and fired operation at constant speed. The crankcase stand was bolted to a vibration isolated pad in a test cell. The engine was final balanced by standard methods at various speeds to minimize vibration.
Head Design. The head used on the engine is a GMR Powertrain Research Program (PRP) head. It is a two intake, one exhaust, two spark plug aluminum head with port fuel injection and overhead camshafts. An early machined casting was obtained, and a segment including just the last cylinder was cut off and sealed with a plate.. The standard fittings and gaskets were used in the head together with standard assembly procedures. The end plate was attached with silicone rubber sealant. Hydraulic lifters are used to operate the valves from the cam lobes.
The camshafts were similarly modified. Each camshaft was ground down until only one set of lobes was left together with a shaft that formed the hub of a pulley system. The camshafts were then driven by a toothed belt via an intermediate shaft geared to the crankshaft. A feature not mentioned in describing the engine photograph in Figure 2 is the support of the camshaft pulleys. Due to the shortness of the shafts and the force of the drive belt on the cantilevered pulleys, a support shelf and ball bearing pillow blocks were added to relieve the front bearing in the cam carriers. This is a simple aluminum journal bearing that could not survive the loading without galling. The structure is visible in Figure 2 between the drive belt and the engine.
Oil was fed to the cam surfaces through the normal head oil passages by an external line from the crankcase and drained back in the same way. The oil pressure to the head was continually monitored by a gauge mounted in the line. Each cam was fed separately, and different cams were used for different tests. The end plate was sealed with silicone rubber sealant.
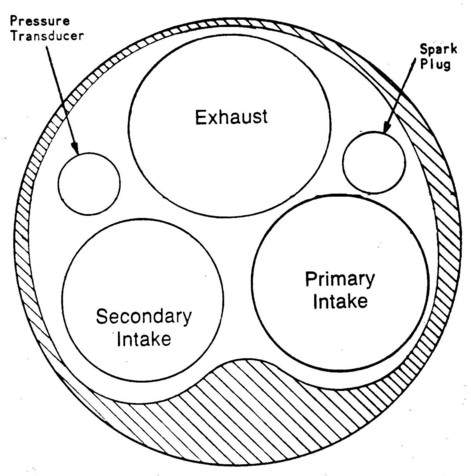
Figure 3. Head geometry - bottom view.
The head was cooled in two ways. The normal head water passages were used through fittings put at either end of the cut down head. Also, a high pressure water passage was added between the head and the liner segment top plate to cool the thin sections of the head and the top plate above the thermally isolated liner. The top plate is set into the head so that the top of the liner, although mounted against the top plate, is even with the bottom of the head. These details are shown in section in Figure 9. Sealing of the head itself is done primarily with gaskets, as in a normal engine, but seals involving the top plate are done with O-rings for ease of assembly.
The geometrical configuration of the head is shown in Figure 3.
The intake and exhaust valves are of different sizes, as shown. The head is designed for two spark plugs, but one has been replaced by a pressure transducer to permit easy combustion diagnosis. The head has a pent-roof shape with the intake and exhaust valves on opposite slopes. The spark plugs protrude to be vertical in the cavity. The head geometry is highly three-dimensional, and the horizontal footprint shown in Figure 3 is deceptively simple.
The intake has two throttles. The main throttle at the inlet of the intake manifold controls the flow to both ports, while the secondary valve flow is also controlled by a throttle set into the head itself. The intake ports are circular at the head, while the exhaust port changes from circular to rectangular at its exit from the head.
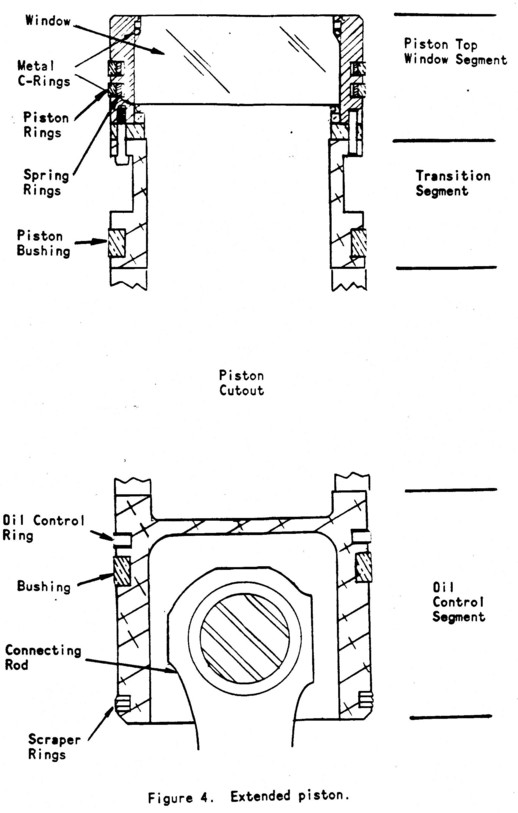
Piston Design. The piston design is shown in Figure 4.
It is a standard extended piston except in the details of the piston-top. As shown, there are upper and lower segments separated by a cutout designed for the insertion of a fixed mirror into the engine. The bulk of the piston is aluminum to minimize its mass, but its top is made of steel to withstand heat.
The lower segment is designed to keep the crankcase oil in the lower part of the engine away from the optical surfaces. There are a set of scraper rings to minimize oil on the wall, and an oil control ring to drain the remaining oil into the crankcase again. In between is a rulon bushing to maintain piston alignment and prevent piston slap. This segment performs most of the functions of a normal piston, including holding the crank pin and connecting rod small-end.
The upper segment is the part that traverses the transparent liner and provides a case for the piston-top window. The steel top is screwed on for easy replacement of the window. In this application, the Biston reaches high temperatures because the liner operates at 300 to 500 C. Also the transparent liner material will not tolerate the abrasion caused by steel compression rings, so other materials must be used as rings.
High temperature materials are one of the areas of special design in the visualization engine. These temperatures are not harmful to such materials as steel or glass (which gets stronger with temperature), but aluminum will lose strength and plastics will not survive at all. In most applications, piston windows are clamped with soft materials such as teflon or rubber. In this case, as shown in Figure 4, the window is clamped between two inconel C-rings which do not deform except at extremely high temperatures.
The piston compression rings are made of graphite manufactured specifically for high temperature work. These rings are soft compared to steel and have a low coefficient of friction. They are not strong, but strong enough to support the friction loading generated by the piston motion. Ring tension is supplied by backing inconel spring rings made to be circular in their loaded configuration. Additional clearance between the piston and the wall is designed to take up the expansion of the aluminum piston with temperature relative to steel. Between the steel piston top and the aluminum body is a beryllium copper spacer ring with an intermediate coefficient of expansion to decrease transition stresses.
The upper rings and bushing remain in contact with the 15.25 cm long liner throughout the stroke. The rings have been located as high on the piston as conveniently possible, since the upper ring will determine how much of the liner will be wiped clean with each stroke.
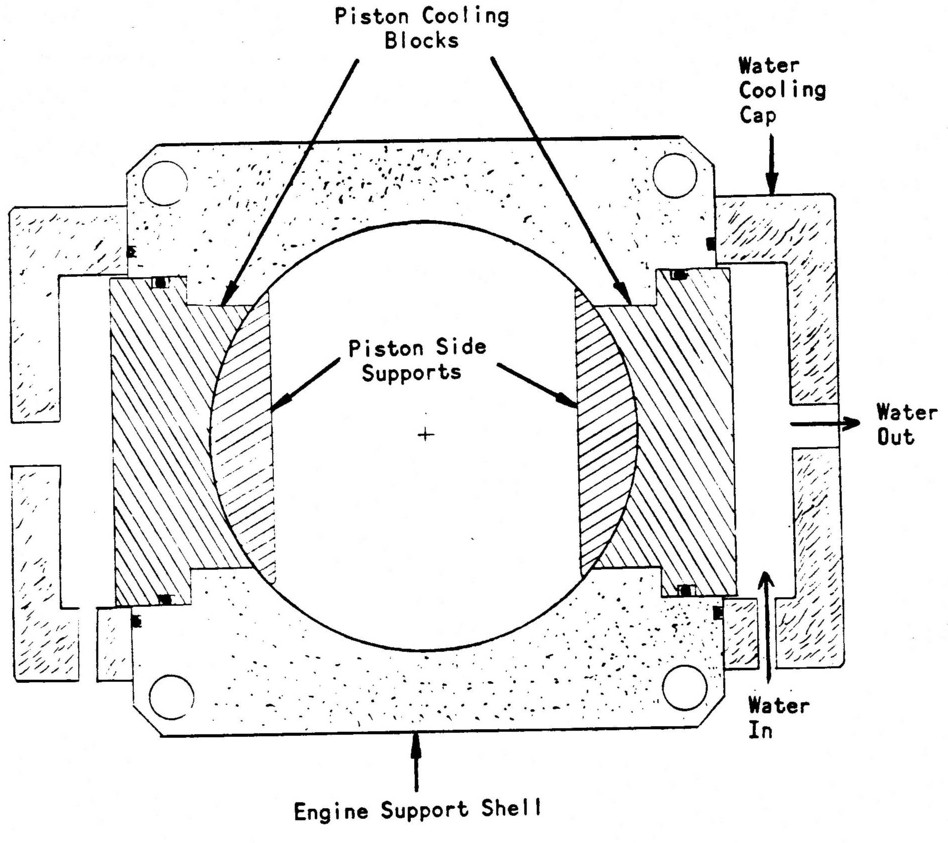
Figure 5. Piston cooling block.
Cooling Segment Design. The block that surrounds the piston cutout (Figure 2) performs an important thermal function as well as providing a mount for the mirror looking up through the piston window. In order to minimize the thermal gradients in the inner surface of the liner, as discussed below, the piston is actively cooled.
This means that the normal heat flow in the engine is reversed, and the piston is a heat sink rather than a heat source to the liner through the rings.
Cooling the piston is made possible by the added length of the piston. Graphite wiper blocks (Figure 5) are mounted in the segment below the liner. These two blocks conform to the outside of the piston wall and are always in contact with it. Both the aluminum and graphite have high coefficients of thermal conductivity so that heat is drawn out of the piston and carried away by water circulating behind the wiper blocks. This provides a novel and simple means of cooling the piston during firing operation.
Control Segment Design. The engine segment that surrounds the bottom segment of the piston is the most like a normal engine. It is a simple steel case surrounding the piston, honed for minimizing ring wear. It extends below the shelf of the crankcase, but is attached to a shorter vertical riser section that mounts on top of the shelf. It is water cooled over its entire length by copper water lines brazed to its surface in a spiral pattern.
Liner Design. Design of the liner for the engine is the focus of the visualization engine project. The liner must withstand the effects of combustion both structurally and as an optical component. Although there are many ways to build windows into a combustion chamber, a transparent liner maximizes optical access and simplicity of design once the basic design problems have been solved.
Requirements: Most of the constraints placed on any liner in a firing engine are due to combustion, in the form of pressure and thermal loading. Design must be based on peak values that are very different than the average behavior, due to the nature of turbulent combustion. The liner must also be unaffected by the chemical environment of combustion, and the fact that the piston rings are constantly wiping across the inner surface. A final factor is that the liner be easily cleaned, handled, and maintained in general. Combustion pressure is uniform throughout the chamber volume, but is often strongly peaked in time, or equivalently, in crank angle. This means that the pressure loads are concentrated at the top of the liner not too far away from top-dead-center (TDC). The peak pressure can vary dramatically in magnitude with spark timing, fuel-air mixture, and other engine parameters. Another extreme condition that can occur is knock, a detonation-like phenomenon that causes rapid pressure fluctuations near the peak pressure. This requires conditions that can be avoided in a normal engine, and can be omitted as a design factor.
With these facts in mind a peak pressure can be assumed for use in designing a liner. Typical pressure versus crank angle curves are given in Figure 6.
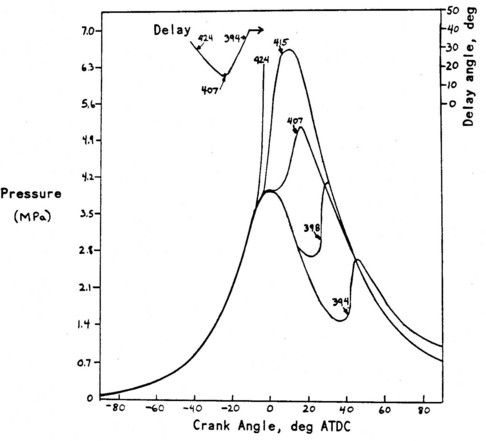
Figure 6. Cylinder pressure.
Maximum pressures are reached if spark timing is set to be somewhat before the peak in compression pressure. For combustion chamber designs that are not pathological, the design pressure for the liner is then approximately 6.9 MPa.
The liner must also be able to withstand both high temperatures and large temperature gradients. These vary in both space and time, and combine with the pressure stress to determine the overall stress levels throughout the liner. Although the highest heating rates are caused by combustion, other significant heat sources are compression and ring friction. During motoring operation these latter sources are major design constraints. Thermal factors are more or less important depending on the thermal properties of the liner material. Unfortunately, optical materials are prone to thermal stress problems, and this will be a major part of the detailed design discussed below.
Heat fluxes to the liner are difficult to accurately predict in detail. Measurements have been made in engines, but these depend on the local heat transfer coefficients that in turn depend on the specific combustion chamber design and operating conditions. However, since the thermal behavior is so important, estimates will be made below in the context of the sapphire liner design. Subsidiary design factors in the design of a transparent liner arise from the necessity that it be uncooled. This implies very different thermal behavior than is usual in an engine, as well as a need for a different mounting system to cope with the thermal expansion that accompanies heating.
Material Survey: There are many transparent materials that are candidates for use as a visualization engine liner. These are classified into plastics, glasses, and crystals. At present there are no metals that are transparent to visible light. Table I lists the current possibilities for liner materials.
The table of materials is meant to be more generic than complete. There are many types of transparent plastics and glasses, but the examples listed are both representative and have typical properties of other closely related materials. The utility of these materials can be assessed on the basis of these examples.
All of these materials are strong enough to be used for motoring operation; they can withstand the hoop stress due to compression. The plastics and even the glasses can only be used for short periods, however. The strength of plastics decreases rapidly with temperature, and they cannot be adequately cooled. High temperature series lexan shown in the table represents the best that plastic can now do in this area. Although glass increases in strength with temperature, these liners are subject to failure due to internal thermal stress that can arise if surface heating rates are too large.
For firing operation, the 6.9MPa pressure coupled with high temperatures does not permit the use of plastics. Lexan may survive a few cycles of combustion, but extensive investigation indicated no way to optically polish it in a cylindrical shape (it is normally press polished). While glass can theoretically survive combustion, the practical design strength implies that it will break spontaneously and randomly. However, it seems that glass will become a viable candidate when its fracture physics are better understood. Another technique that can be used to make a glass liner viable for engine studies is to design the engine so that standard glass tubing can be used. Inexpensively available in large quantities, tube pieces can be selected for adequate roundness and replaced when they break. Although this approach is being attempted elsewhere, a sufficiently robust engine that will tolerate many glass chips has not yet been built to allow debugging and complete experiments. To detail the research behind these conclusions is beyond the scope of this report.
The only real candidate for a firing transparent liner is sapphire, as is shown below. Under normal circumstances, even sapphire is marginal. It is certainly not easily available and not cheap. Single crystal sapphire without defects can be grown to sizes of more than 25 cm in diameter, but the process is expensive. Its strength approaches steel and its thermal and chemical resistance is excellent. A similar material, cubic zirconia, cannot presently be grown to a large enough size.
SAPPHIRE
Introduction: Sapphire as a material has long been known as a gemstone. It occurs naturally with a faint blue color and with a red color, better known as ruby. Commercially its largest use is as a polycrystalline opaque material more commonly known as corundum. As a refractory material this has a wide variety of uses. As aluminum oxide, sapphire is also a very commonly used abrasive.
Transparent sapphire is widely used today because it can be relatively easily grown as a single crystal. Applications include windows, integrated circuit substrates, precision orifices, and even as braces for straightening teeth. One major scientific use is the ruby laser. Single crystals can now be grown in diameters up to 38 cm so that engine applications such as this one are feasible, if expensive. The primary expense arises from the sophisticated control and long times needed for growth.
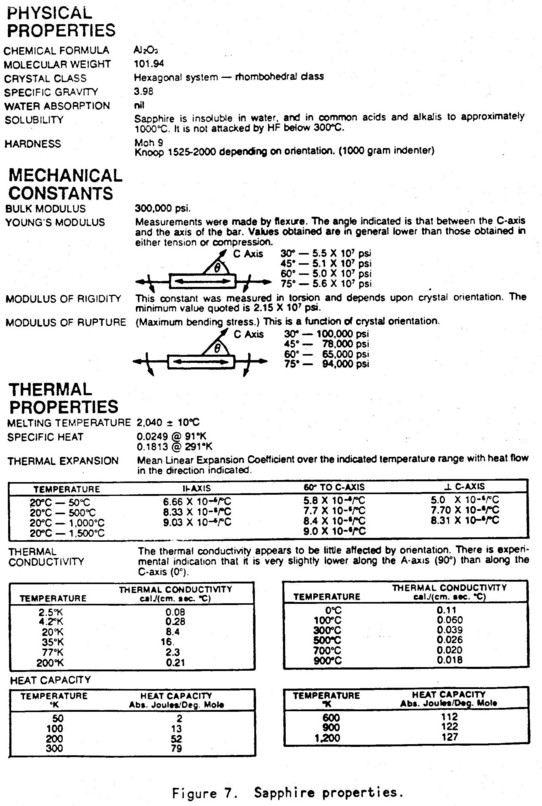
The major properties of sapphire as a single crystal are given in Figure 7, and the basic reference [18] is a Russian book.
Crystal Structure Description and Chemistry: Chemically, sapphire is aluminum oxide, Al 2 03 A s a crystal, it is naturally clear, colored by impurities such as chromium to become ruby. Sapphire has a close-packed lattice structure with hexagonal symmetry, and thus has a major symmetry axis, the C-axis, and six minor A-axes.
There are two phases of aluminum oxide. Sapphire is the high temperature form, known as leucosapphire or α-Al2 03. The low temperature phase, γ-Al2 03 is a softer material found as a common oxidation product on the surface of all untreated aluminum metal.
Most of the properties of sapphire are orientation dependent. This includes both mechanical and thermal properties. Exploration of the details of this behavior is beyond the scope of this work, but macroscopic influences of the crystallographic structure are widespread. Sapphire is chemically inert for all practical purposes at room temperature.
Mechanical Properties: The major mechanical properties of sapphire are shown in Figure 7. Orientation dependent properties are an important design criterion not normally encountered. As is shown, the maximum bending stress increases 50 percent from its lowest value in one direction. In a cylindrical system such as the liner discussed here, the cylinder axis is typically chosen to coincide with the crystal C-axis. In this way the liner properties are symmetric about the cylinder axis.
Sapphire is the third hardest material known, following diamond and cubic zirconium, with a MOH rating of 9. Thus, it is difficult to polish but able to withstand rubbing of materials such as steel (e.g., piston rings). In practice, however, it is fairly easy to scratch, since alumina sandpaper is widely used, and particles can be trapped in
a rubbing surface. Another common mechanism for scratching is the breaking off of small pieces from the edge, again embedding in a rubbing surface.
The detailed process of sapphire fracture is very complicated, analogous to brittle (versus ductile) fracture in metals. In normal circumstances, failure begins at a stressed surface imperfection. At that location a crack begins to grow through a combined chemical and mechanical effect. The crack then propagates by a sequence of mechanisms to end in total failure of the piece. Overall strength measurements are a result of this process [19] and are a statistical value depending in detail on the surface and a number of other factors. The science of fracture mechanics of crystals is not well developed at this time, although some predictions can be made. Note that the quoted mechanical strength of sapphire is similar to steel, and much greater than glass, which has a design strength of 35 MPa. As discussed below, both of these materials are inherently much stronger, but they fail because without very special surface preparation their surfaces are always flawed.
For the design of a sapphire cylinder the most obvious constraint is the cylinder internal pressure. There is a motoring compression pressure and a combustion pressure that depends on the spark timing. As a worst case, 6.9 MPa was taken as the maximum working pressure. Based on a simple hoop stress calculation the tensile stress in the liner is
σ = p (d/2t)
where p is the internal pressure, t is the wall thickness, and d is the cylinder diameter. For d = 92.0 mm, t = 5.0 mm
σ max = 35 MPa
Although this is not a large number compared to the strength of sapphire, the primary constraint is the thermal stress discussed below. The thermal stress prevents designing a thicker wall to reduce pressure stress levels.
Thermal Properties: Thermally, sapphire behaves quite closely to some steels. For comparison, the properties of stainless steel are shown at the bottom of Table 1. The thermal conductivity values of sapphire are closest to that of stainless steel, while its thermal diffusivity is closest to plain carbon steel. Sapphire maintains its structural integrity up to 1600 to 1700°C, when it becomes increasingly plastic, until it melts at approximately 2000°C.
Thermal stress, the generation of mechanical stress due to differential thermal expansion, has long been a problem with sapphire. This is due to comparatively large coefficients of both thermal conductivity and expansion, together with anisotropic crystal properties. Residual thermal stress prevented the manufacture of large crystals until the 1940's. Pieces would often crack spontaneously after both short and long periods of time. Once residual stresses have been eliminated, the primary danger of thermal stress is thermal gradients due to heat sources.
This problem is crucial for the design of a sapphire liner for an internal combustion engine, where the heat input to the liner is of necessity oscillating and large. In this case there are heat pulses that pass through the wall on a time scale determined by the thermal diffusivity of the material. The inside is always hotter while the outside is colder: the expansion of the inside causes the inside surface to be in compression and the outside to be in tension.
Thermal Stress Design: An estimate of the thermal stress in a liner can be made with some simplifying assumptions. For simple thermal expansion the deflection, δt, due to an increase in temperature, ∆T, is
δ t = cE ∆T L
where cE is the coefficient of thermal expansion and L the original length. Deflection of a material under a stress) σ, is
δ p = σ L/E
where E is young's modulus. If the stress is caused entirely by thermal expansion
δ p = δ T
and
σ = E cE ∆T
For sapphire
E cE = 2.8 MPa/°C
so that the thermal stress from a temperature gradient of 150°C is σ = 420 MPa
This stress level approaches the strength of sapphire. The analysis Is only exactly true for a beam that does not bend and has been clamped to fix its length at room temperature, and then is heated 150°C. The resulting stress is compressive. The calculation, however, does illustrate the level of stresses involved.
The combination of thermal and mechanical stress determines the overall stress levels in the sapphire. Since the hoop stress decreases with the thickness of the cylinder for a fixed inner diameter, the thickest liner will minimize pressure stresses. The design for minimal thermal stress is more subtle.
If there is a heat input to the inside of the cylinder there will be a temperature gradient through the wall that propagates outward at a rate determined by the thermal diffusivity of the material. With no cooling on the outside (a transparent liner with optical access) the heat will be transmitted through the wall and steadily raise the outside temperature until the driving heat source has stopped. The overall thermal stress is determined by the total temperature difference, so the thermal stress will be determined by the maximum gradient from the inside wall to the outside wall. The controlling material property is the thermal diffusivity, α,
α= k / ρc
where k is the thermal conductivity, ρ the density, and c the specific heat. The case of transient heat transfer to a semi-infinite solid initially at a uniform temperature, Ti, can be solved exactly:
(T - T)/(Tf-TI) = [erfc (x/2(at)0.5) - exp( xh/k+ at/(k/h)2] erfc (x/2(at)0.5 + (at)0.5/(k/h))]
where h is the surface heat transfer coefficient, and erfc the complimentary error function, erfc(w) = 1 - erf(w). When the heating begins, the heat transfer to the surface is high, the surface temperature is low but the heat has not penetrated into the material. As time increases (measured by the parameter h(at)0.5/k) the surface temperature increases and the thermal gradient propagates into the material. If the wall is thin, the gradient quickly reaches the outside surface and the temperature there will rise. The overall gradient (and thus temperature difference across the wall) will then decrease because heat transferred at the inner surface has gone down due to the rise in surface temperature and decrease in the resulting temperature difference at the interface. If the wall thickness is increased, the thermal gradient will take longer to reach the outside and the inside surface will get hotter before the temperature at the outside begins to rise. The temperature difference from the inside to the outside and thermal stress will increase with increasing wall thickness; thus, there is an optimum wall thickness that minimizes total stress as the sum of hoop stress and thermal stress.
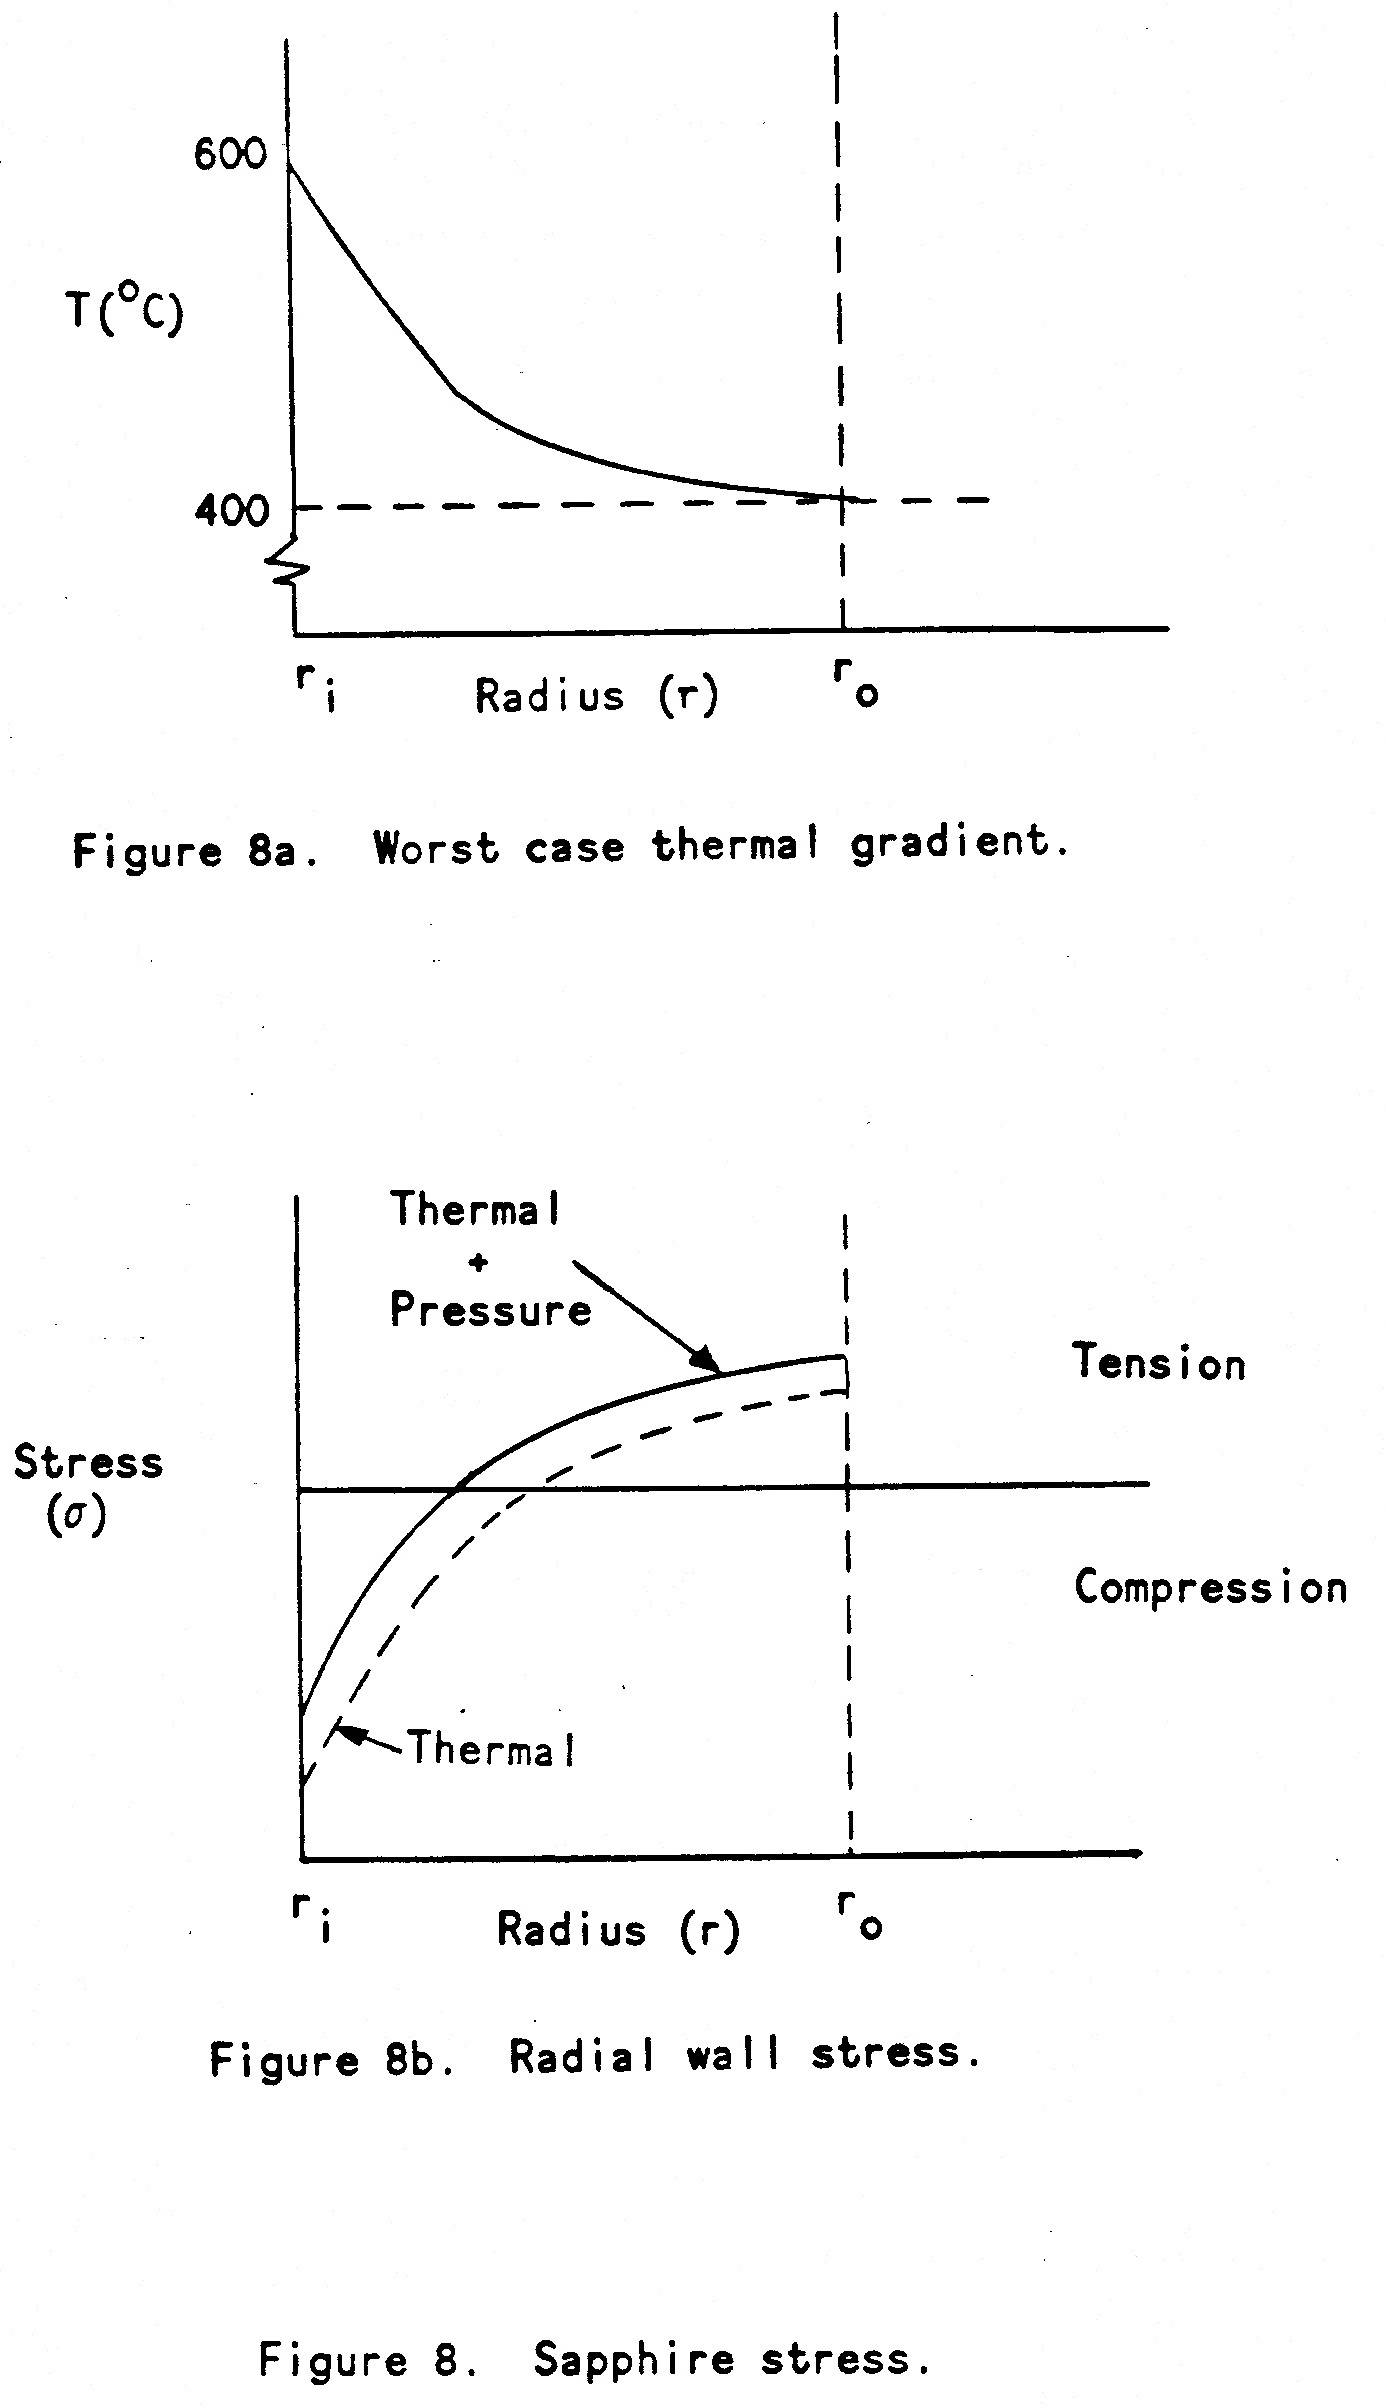
The problem of the transient behavior of a sapphire liner in an engine has been analyzed in detail as part of the work at Stanford by Richmond [16]. The thickness optimization was performed, and resulted in a best wall thickness of 5 mm. The worst case was found to be after 50 cycles of engine operation at 1000 rpm, where the temperature difference and the tensile stress at the outside wall were a maximum. Figure 8 describes the state of the liner at that time. Figure 8a shows the thermal gradient through the wall. Because the heat input is intermittent the outer wall has reached a fairly high temperature before the maximum thermal gradient is reached. Figure 8b shows the radial stress in the wall at the 50th cycle. The stress due to thermal effects alone is shown as the dotted line, and the total stress is shown as a solid line. Failure will occur at the outside surface where there is maximum stress. There are also axial gradients, but these are of lesser importance.
The stress calculations done at Stanford used a best guess for the heat transfer coefficient during combustion to do calculations of the safety factor for sapphire, i.e., the ratio of actual to failure stress. Their calculated safety factor was 1.0, plus or minus 50 percent due to uncertainties in the surface heat transfer. In their analysis, sapphire cannot be used safely.
For the present work a number of techniques have been used to increase this safety factor to an acceptable level. There are two basic routes to an increase in safety factor. Either the strength of the material must be increased through some form of processing, or the thermal stress during operation must be reduced.
The strength of sapphire can be increased in a little known process described below. It involves applying a glass glaze onto the outside of the sapphire. Data indicates that this may increase the strength of the sapphire by a factor of 3:4. Under normal conditions the sapphire will fail at a surface in tension, so such a glaze on only the outside surface should result in a significant increase in overall strength of the liner as a whole. This is fortunate, since a coating on the inside would be destroyed by ring scraping during operation.
The thermal stress in the liner can be reduced in a number of ways. The most obvious is to operate the engine in skip-fired mode, where the engine burns fuel for only a few cycles with intervals of motoring operation during which the temperature gradients disappear. In this case, the temperature difference between inner and outer surface is greatly reduced and so is the overall thermal stress. This mode of operation requires special engine controls that have been used in this work. In this case port fuel injection cannot be used because it requires three or more cycles to reach equilibrium due to the necessity to build up a liquid layer inside the port. For this reason propane fuel is the primary fuel.
To further reduce possible temperature differences, the liner is thermally isolated as described above. This allows the liner to equilibrate at a higher temperature so that the heat pulses can dissipate into a temperature rise, as well as diffusing.
The piston is also cooled, an unusual capability described earlier. In normal engines, heat flow is into the piston from the gas, then through the rings to the liner and drawn away by coolant. In this engine, heat is drawn out of the piston by the cooling blocks so that heat is conducted out of the inner surface of the liner through the highly conductive graphite rings and aluminum piston body. The large heat pulses that enter the inner liner wall with each combustion event are partially drawn out each time the rings pass by; twice per burn.
In this way it is expected that the safety factor of this visualization engine will be adequate for firing operation. That this is the case will be verified by closely monitoring the behavior of a geometrically identical stainless steel liner during firing. The time history of the steel liner temperature is measured in real time at different points on its surface as the engine operates, and the thermal behavior of the whole engine structure is monitored. Although the sapphire liner cannot be instrumented like its steel counterpart, enough measurements of its temperature and expansion within the engine will be made to be sure that its thermal history is accurately known and its thermal stresses are within acceptable limits.
Sapphire Processing: The single crystal sapphire discussed here was grown in a vacuum furnace with a closely controlled thermal gradient by Crystal Systems, Inc. The crystal cake, or Boule, is grown from a seed crystal of a prespecified crystal orientation. Typical boules are 20 cm in diameter and 18 cm high.
Each boule is unique because the process is not well enough controlled to give a perfect crystal every time. The material is classified into different grades according to the number and type of imperfections in the boule. These consist of bubbles, subgrains, and other lattice defects. Flaw detection techniques are crude, based mainly on the optical activity of sapphire; the transmission of polarized light depends on the crystal orientation, so that local orientation changes result in shadows.
The piece used in the engine, although supposedly a perfect single crystal, showed defects in one end. These were seen by shining a laser down its length through polished ends. The end with defects was placed at the bottom of the stroke in the engine where it would not be subject to pressure stresses or maximum thermal stress. Most probably the defects were a series of slip dislocations.
The desired shape is cut out of the boule by diamond saws and then final polished by another company. Polishing sapphire is very difficult, due to its hardness. A common 60/40 optical glass polish does not quite mean the same thing for sapphire. Sapphire is not machined flat on a microscale, but is precision machined, then polished. The best polish available is an "epi-finish". In this process, all of the scratches are removed by diamond polishing, but the surface still possesses undulations of a larger scale. This, for example, prevents the use of laser interferometry or high quality doppler anemometry because the surface is not geometrically flat as it would be in glass. This polish is very important for strength, however, as discussed below.
Since the strength of a piece of sapphire is determined by the condition of its surface, the preparation of that surface is crucial in an application demanding maximum strength. The most obvious technique for removing surface flaws is polishing, as discussed above. Other techniques not so commonly used are fire polishing, chemical polishing, coatings, and immersion in a fluid.
Fire polishing heals surface flaws due to mobility of the material at high temperatures at the surface, while chemical polishing removes the high energy flaw sites by removing material through chemical attack. The classic case of decreasing the effect of surface flaws by immersion in a liquid is the dramatic increase of the strength of glass when wetted with water. This phenomenon is complex, but is thought to reduce the chemical reactivity at the flaw site that is necessary for crack propagation.
The method applied in this work to achieve an increase in the strength of sapphire is the application of a glass glaze on the outside surface. This technique was developed for special applications where a very high strength transparent material was desired [20,21]. It was originally thought that the effect was that of a compressive layer reducing the stress on the flaws (but it is now believed that the measured increase in strength of a factor of 3-4 is due to healing and sealing of the flaws during the glazing process) and the protection of the surface afterwards by the glaze. Cylinders using the glaze have been used to test fluids at extremely high pressures [22].
The glazing process is experimental and was performed by a company no longer in business. It involves hand spraying onto the outside surface a layer of lead glass frit powder in solution. The piece is then baked at approximately 1400°C and allowed to cool slowly. The glass glaze comes out totally transparent.
The engine liner is the largest piece ever attempted. The glaze did not totally cover the ends) nor was the coating flat. The coating was ground and polished to achieve a good optical surface) but nothing could be done about the small areas near the end that were not covered. The gaps were caused by crawling of the molten glaze away from the ends of the cylinder at the location of each of the six crystal axes, apparently due to the increased surface tension there.
The achievement of higher strength cannot be tested, of course, since controlled failure tests are out of the question.
Optical Properties: Optically, sapphire is an excellent material. It has high internal transmittance from 150 nanometers to 6000 nanometers in wavelength; from the far UV to the middle infrared. It has an index of refraction of 1.77 (versus 1.5 for quartz) in the visible. It is also birefringent, meaning that the index of refraction is both polarization and direction dependent. This can present problems for certain kinds of optical work. The higher index of refraction also causes higher surface reflection losses.
Quartz: Glass is the optical material most commonly used both for commercial purposes and for research. In spite of this, its fracture strength in tension (not compression) is unpredictable and small. Although not a crystal, it breaks in a similar way when microscopic surface flaws provide the initiation point for the formation of a crack, which then grows rapidly to macroscopic size and the dimension of the piece.
Although quartz has a much lower coefficient of thermal expansion than sapphire, it is also subject to large thermal stresses relative to its strength. Calculating a thermal time constant similar to that discussed above gives a value of approximately 8 minutes; a much longer time to maximum stress.
The primary difficulty with using quartz is that it is fragile when handled. In an engine application that requires constant removal and cleaning, a consistently high level of care is necessary. This level of effort is rarely available in practice. Furthermore, this fragility implies mounting techniques that only use soft materials at structural contact points. The physical reason for the fragility is that glass is so hard it does not deform locally to accommodate protrusions in a mating surface, leading to very high point stresses and fracture.
Another problem is scratching of the inner surface due to hard particles embedded in the rings. Rings must be discarded if their history is unknown or questionable. The work area must also be kept free of "sandpaper". Both teflon and graphite rings were found to leave the quartz free of scratches) although the teflon would burn and leave a residue if allowed to get too hot. Quartz does become stronger as it gets hotter, so UNIFORMLY hot operation is actually preferable.
A 12.7 mm thick quartz liner has been used for motoring studies, and appears to be quite adequate for short periods of operation) within the above constraints. Because of the low coefficient of thermal expansion the pneumatic end loading device was not used. In practice, one quartz liner survived for 11 months of intermittent operation while accumulating some large chips on the top outside from mounting errors, and some small chips on the bottom inside from assembly errors. It finally failed due to thermal stresses during a 25 minute operating test at low speed with graphite rings.
Lexan: As mentioned above, lexan is the best candidate among transparent F-lastics for use in this visualization engine. It has adequate mechanical, thermal, and optical properties, and was used in some initial testing. Unfortunately, no way was found to polish it in a cylindrical shape. It is typically hot-press polished in sheet form, but extensive research discovered no high quality optical polishing technique for curved internal surfaces, even by the manufacturer. Other plastics are impractical due to very short operating times.
Nest Design: The structure in which the liner is mounted, the liner nest, has a number of simultaneous purposes. It must provide thermal insulation, structural support, and pressure sealing. It must also be easily assembled and disassembled, and accommodate the thermal expansion of the liner. At the same time it must be a very open structure so that optical access to the transparent liner is limited as little as possible.
The liner nest structure is shown in Figure 9.
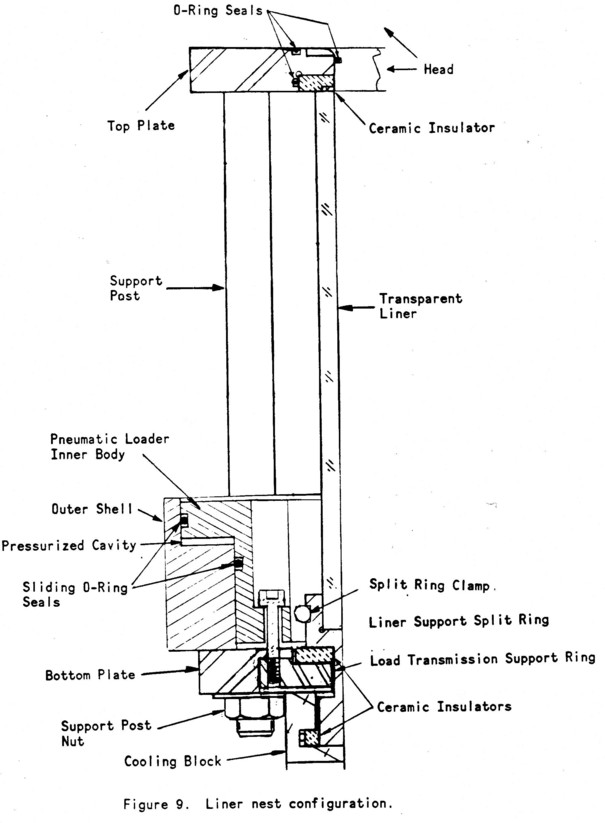
It is designed as a sandwich with the liner clamped between top and bottom plates. These plates are separated by thin, high-strength steel pillars which fix the spacing between the plates. The head is attached to the top plate through holes that have been drilled and tapped to be compatible with the original head bolt pattern. The nest and head are attached to the lower part of the engine at the bottom plate. The liner is insulated from its support structure by machinable glass (Macor) discs. The top disc is inset into the top plate and the top plate is recessed into the head so that the transparent liner extends all of the way to the bottom of the head. The Macor is fragile and is inserted on top of a thin paper gasket pad.
Pressure sealing is done with O-rings when possible. In the top plate the two lower O-rings (of three) in Figure 9 seal in the combustion gases, while the two upper O-rings seal a water passage that provides extra cooling to the critical area at the head-cylinder boundary. The liner seal to the macor must tolerate the high temperatures at which the liner operates. For this seal a special refractory ceramic paper gasket is used.
The liner is seated in a three part split ring that extends its inside diameter further downward. The piston rings remain in contact with the transparent liner throughout the stroke, but the top piston alignment bushing is captured by this extension at the bottom of the stroke. The split ring is clamped onto the outside of the liner so that it expands and contracts in diameter with the liner. The split ring and liner together are thermally insulated by a split macor ring beneath them.
The liner "floats" within the nest. It is pushed up against the top plate by a radially concentric ring structure at its base that is supported from the bottom plate by gas pressure. The split rings and liner ride in a whole ring that is attached to the inner ring of the pneumatic loader. The outer shell of the loader (Figure 9) rests on the bottom plate, so that an external pressure source will cause the inner rings and liner to be pushed against the top plate with a force determined by the gas pressure and internal area of the pneumatic loader. This complicated three-dimensional structure permits the liner to be supported vertically with a constant force independent of its temperature and thermal expansion. The design avoids thermal stresses that would otherwise be caused by the necessity of operating the sapphire liner at high temperature, since it has a comparatively large coefficient of thermal expansion. The liner nest vertical dimensions are such that at maximum expansion there is still a gap inside the loader and between the bottom of the split ring and the cooling block beneath it.
ENGINE ASSEMBLY
A visualization engine has special needs that require easy physical access to the liner, primarily for cleaning the internal surfaces. The structure of the visualization engine discussed above makes this simple - the head, top plate and support pillars can be removed by taking off the cam belt and the nuts clamping the pillars to the bottom plate. The liner can then be cleaned with the piston at bottom dead center, or removed completely. Removal of the top plate involves disassembly of the head to gain access to the head bolts underneath the cam covers.
The installation of graphite rings requires some special equipment and techniques because they will break before they bend significantly. This is important because the backing inconel spring rings are circular in their compressed state but almost elliptical in their free state. To compress the graphite on the spring rings, two thick half shells of steel were made with an inner diameter equal to that of the liner. After a shelf was clamped onto the piston, the graphite rings (in two equal halves) were set on the shelf in contact with the inside of the half shells. The two halves were then brought together until the inside points of the graphite rings contact the spring ring. The two halves are then continually brought together by screws between tabs on the shells; the inner tips of the graphite half rings slide along the spring ring, compressing it until its outer surface conforms to the inner surface of the graphite rings. Once the steel shell halves come together the liner is lowered over the piston, displacing the shell and passing over the compressed ring. The shell and the shelf are then removed in halves. In this way the liner is put on over two sets of rings and the upper piston bushing.
Another crucial assembly technique is the tightening of the cam cantilever support. This support is made of two feet that bolt onto the side of vertical legs that come down from the shelf on which the cam pillow blocks are attached. These pillow blocks are tightened down first and the cams rotated by hand to be sure they do not bind. The feet are tightened, then the vertical supports on each side are bolted together. The cams are rotated again and the process repeated until no more friction can be sensed. If the support feet are bolted down as a final step, the joint compression and vertical movement is enough to lock the cam against the journal, since the head position has already been fixed by the primary engine support structure through the liner nest and head bolts.
ENGINE INSTRUMENTATION
Operating Diagnostics. The engine has standard monitoring sensors in the form of a manifold absolute pressure (MAP) sensor and oxygen sensor on the exhaust pipe, and various electrical signal sensors. Foremost among these is a shaft angle encoder that records crankshaft position to a tenth of a degree accuracy.
In addition, the pressure in the engine cylinder is measured by an AVL piezoelectric pressure transducer placed in the spark plug hole nearest to the secondary valve. This transducer is coupled to a charge amplifier via a low capacitance cable and has a high-level voltage signal output.
The liner expansion is measured by a linear potentiometer attached to one of the liner nest support rods with its sensing arm glued to the inner segment of the pneumatic loader. The sensor is accurate to 0.02 mm.
One other important operating diagnostic is the optical access itself. This allows continual inspection of the rings, valve timing and clearance, spark, and chamber combustion deposits.
Visualization Diagnostics. There are a number of diagnostics that will be used in the visualization engine. The primary technique, however, involves the use of video cameras to record two dimensional maps of different tracers or combustion phenomena. Stereo video imaging provides the volume information needed to understand complex internal flows and provides adequate resolution for most purposes, while greatly reducing the necessary experimental development time. High temporal resolution can be achieved by gating the light amplification of the image intensified cameras.
The most difficult problem in diagnosing in-cylinder fluid behavior is to measure flow velocities throughout intake, compression, and combustion. The flow field is highly three-dimensional and is complex both spatially and temporally.
To solve this problem, a new velocity diagnostic was developed. This diagnostic measures velocity by imaging the displacement of marked lines in the flow and is described in detail elsewhere [23]. In a flow seeded with phosphorescing particles, lines are excited by a UV laser and then deformed by the local velocity field as the phosphorescence continues. An instantaneous image of the displaced line is captured by low-light-level video cameras and digitized for quantitative analysis. Three-dimensional information is obtained by using two cameras simultaneously to give a stereo view of the marked flow.
This diagnostic represents a compromise between the need for massive amounts of information to decipher a fully turbulent flow and the need to be able to interpret the data with a reasonable amount of time and effort. Information is only recorded along the line or lines, but any part of the flow can be examined.
Many other flow marking methods are available for use with stereo imaging. One such technique is included below in a discussion of preliminary results from the engine.
Visualization Data Analysis Graphics. Raw visualization data is in the form of digitized images with 8-bit (I part in 255) gray-scale images. The images are standard American (NTSC) video, stored in frame buffers as 512 by 512 arrays. These pixel arrays are transferred to the memory of a controlling IBM PC/AT for manipulation by a local image processing package or transfer to diskette or mainframe.
Extensive programs have been written on the mainframe to analyze and display the data, and compare it to modeling predictions. The program is operated as a menu-driven interactive tool that will display full resolution pixel images in the context of the three-dimensional engine geometry as well as derived quantities such as vector velocities. Two and three-dimensional views can be selected and shown, or depth perception can be added through a number of different techniques.
ENGINE OPERATION
The visualization engine is always operated in a standard dynamometer setup for both motoring and firing. Operation is rarely continuous, mostly limited to runs varying from a few minutes to 10 or 15 minutes. The engine can be brought up to a constant speed in less than a minute and shut down much more quickly.
Firing operation is controlled by a special timing unit that permits triggering of the spark for any preset number of cycles. This is crucial for the control of the thermal gradients in the engine that may cause the liner to fail. This unit and a diagnostic timing unit allow engine diagnostics to be triggered at a fixed crank angle in any cycle for any crank angle interval. This capability is used to do cycle-resolved data studies as well as building up ensembles of data for calculating mean flow quantities.
FLOW VISUALIZATION TESTS
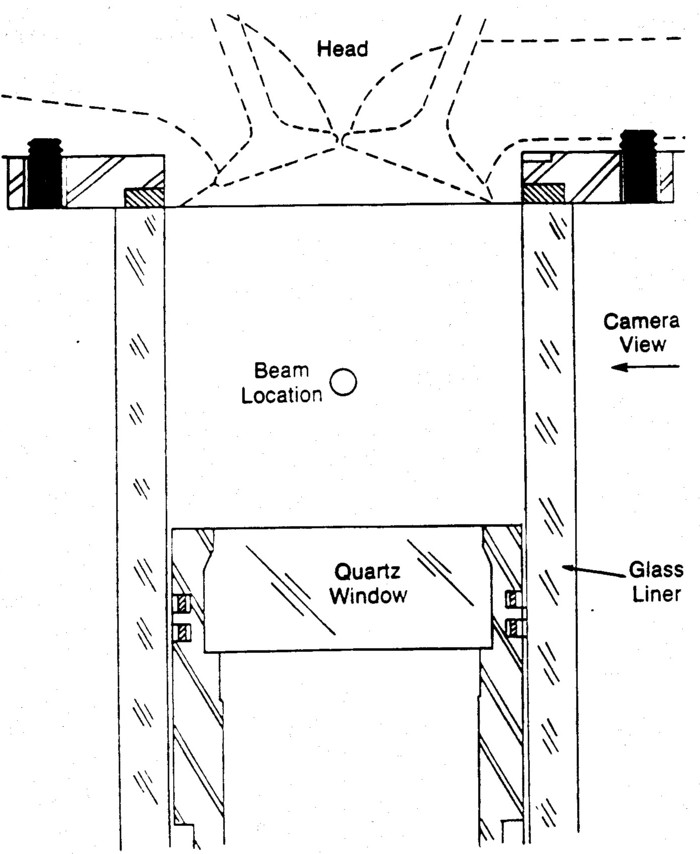
Figure 10. Engine geometry - side view.
Low-Speed Fog Visualization. In order to begin to explore the complexities of in-cylinder flow, series of simple fog mixing experiments were done in the engine with a lexan liner. The engine was rotated by hand at speeds in the range of 10-50 r/min. It should be noted that the flow is not truly representative of typical automotive engine flows unless the speed is at least 350 r/min. Above this speed the flow remains similar at different speeds.
A mineral oil fog was generated by a 6-jet TSI atomizer and its output flow fed into the primary intake port in the head. As in all of the tests described in this work, the secondary valve opens but its intake is throttled off in the head. An argon ion laser operating at a few watts power level was used to illuminate the fog with a 5 mm thick sheet of light through the cylinder.
First, the light sheet was put into the cylinder parallel to the cylinder axis along the axis of the intake valves so that it illuminates cross-sections bisecting the intake flow around the valves. Figure 10 shows a diagram of the engine indicating this camera view and Figure 11a-b show 35 mm photographs of the fog under these conditions.
Next, the sheet was rotated to be horizontal and placed near the top of the cylinder, again to investigate the valve flow patterns. Figure 11c-d show this case, taken through the piston-top with the background seen by the drawing in Figure 3. All cases show a different engine cycle, and although the fog fills the entire cylinder in varying amounts, it is essentially transparent except where it scatters laser light. The thinness of the beam then implies that the photos show a cross-section of the fog concentration inside the cylinder.
It is important to note that the data indicates mixing rather than velocity, although vortex-like structures stand out strikingly.
The best photos were taken by filling the cylinder with fog and then bringing in clear air in the next intake event. This is the situation for all of the figures shown. The horizontal lines in Figure 11a-b are polishing marks in the lexan) while the bright vertical lines are internal reflections of the laser sheet. The intake valves can be seen at the top of the picture and the piston top at the bottom. The valves can again be seen in the background of Figure 11c-d.
The first conclusion that can be drawn from the data is the extreme complexity of the flow; it is convoluted in all three dimensions. In addition to this, some flow structures can be seen. Figure 11a shows an apparent toroidal vortex coming off of the intake valve. It has a counterpart toward the center of the cylinder but not near the wall. Figure 11b seems to indicate that vortices are continually shed off of the valve. The counterpart of the mushroom
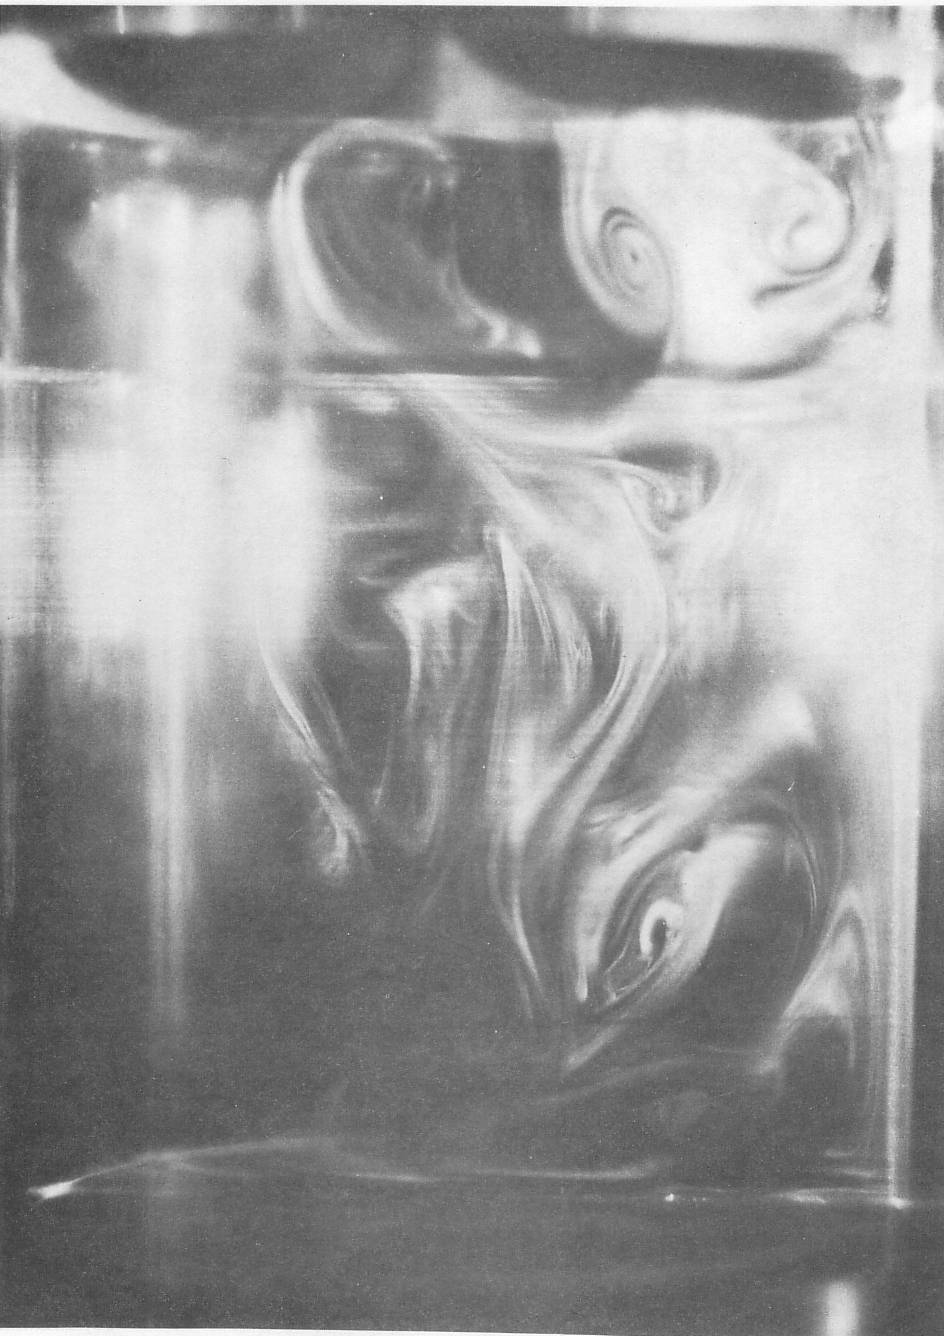
Figure 11a. Mixing flow visualization - vertical.
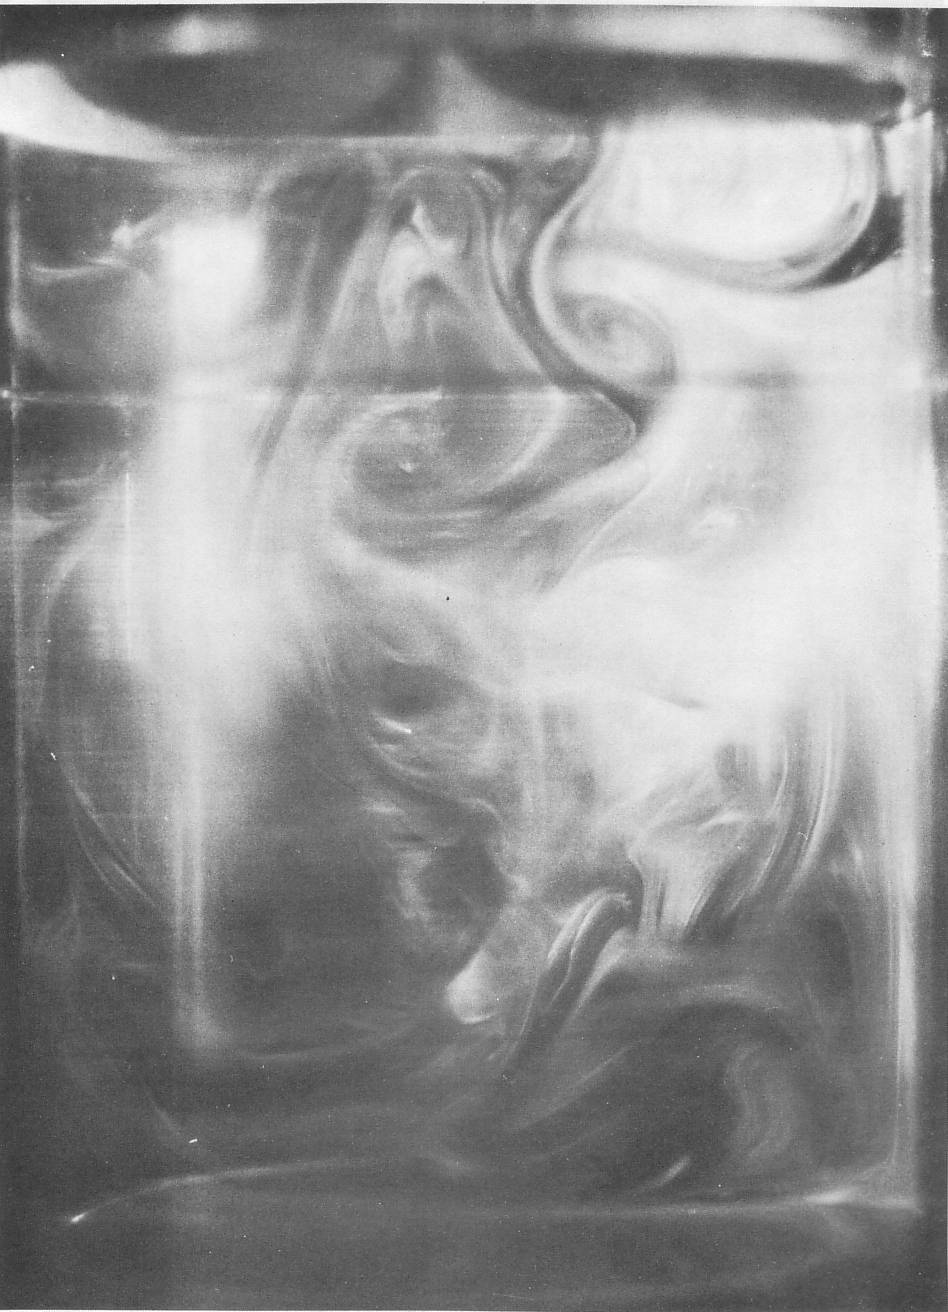
Figure 11b. Mixing flow visualization - vertical.
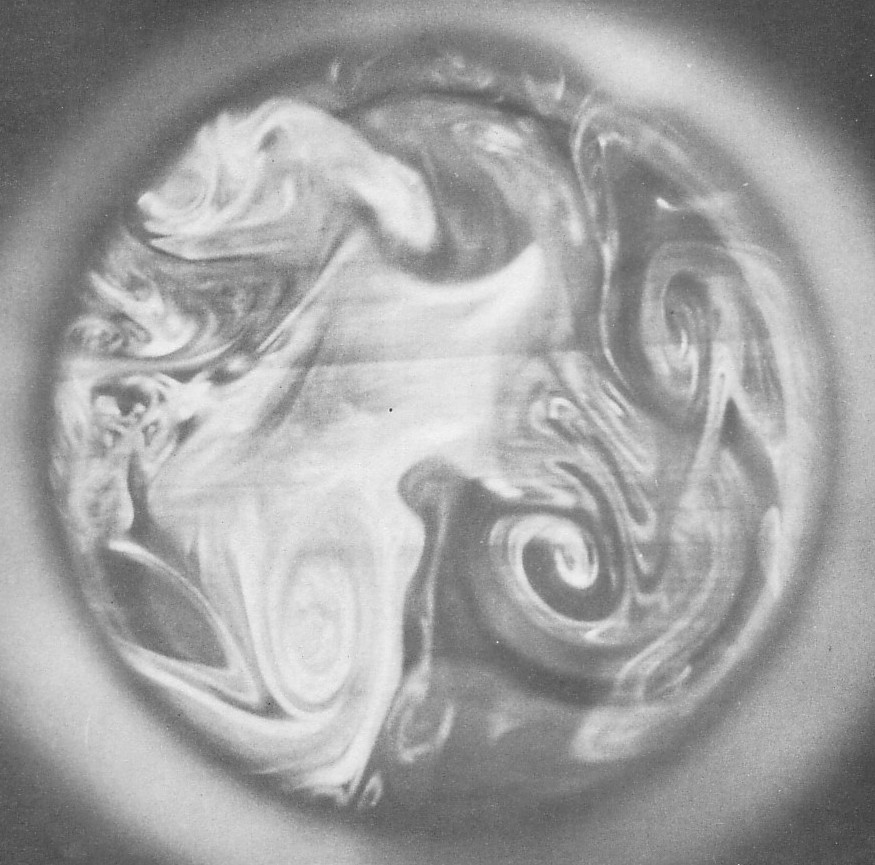
Figure 11c. Mixing flow visualization - horizontal.
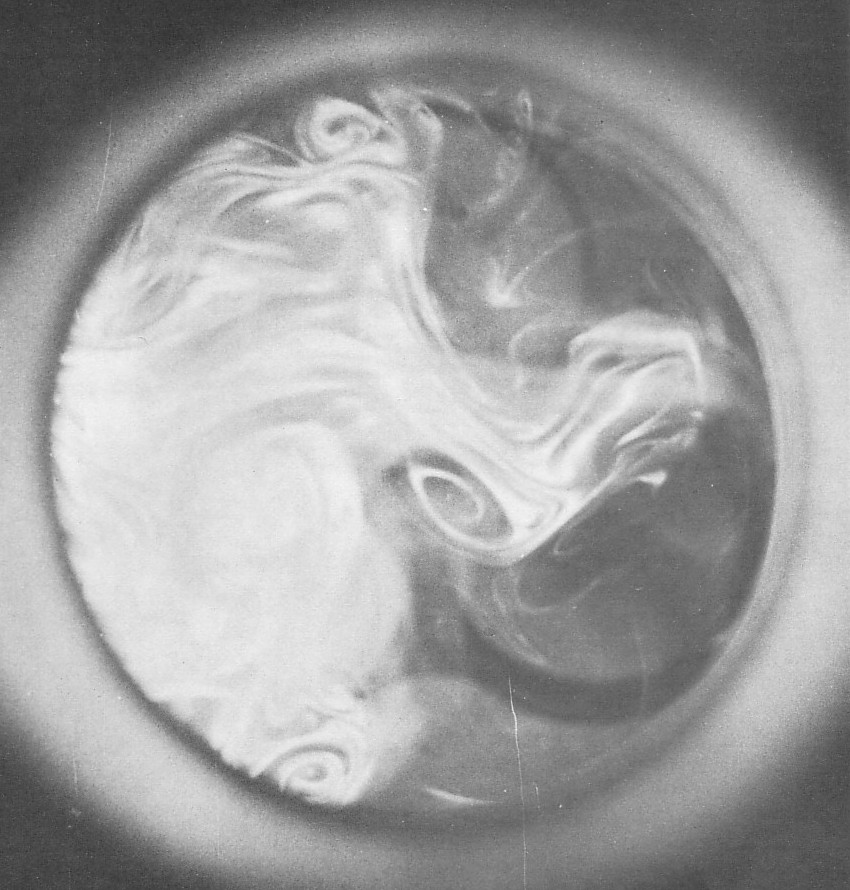
Figure 11d. Mixing flow visualization - horizontal.
shape seen in the center of the cylinder in Figure 11a is seen again further down in the cylinder in Figure 11b canted at a different angle. This is consistent with many studies that indicate that valve flow is similar to a flapping jet. The jet is strongly constrained near the wall, however, and must lead to very different flow down into the cylinder.
Figure 11c-d also show vortical structures in the vertical direction; both figures show a double vortex associated with the very unusual three-dimensional geometry in the head. With both valves open there is a channel for flow out of the lower left part of the valve bounded on the left by the secondary valve which is also open, and the head itself which protrudes out into the cylinder as shown in Figure 3. This channel is the cause of the strong vortices at the center left of the figures. A weaker vortex associated with the valve and wall interaction is seen in Figure 11d.
These mixing photographs show that the flow in the cylinder is complex and highly three-dimensional as a result of both valve jet instability and the geometry of the head solid boundaries. Unfortunately, at higher engine speeds, mixing is much more rapid and concentration gradients are only visible near the intake jet. Some data were taken at 100 r/min, but only faint patterns were visible.
Displaced-Line Velocity Data. Some data has been taken with the displaced-line velocity diagnostic that is being developed specifically for this engine. The diagnostic, described briefly above and in detail in [24], was used with one exciting beam as indicated in Figure 10.
The data to be described were taken from the initial trials of the diagnostic in the engine, set up with a 12.7 mm thick glass liner. Experiments were conducted at 500 r/min at open throttle with no flow through the secondary intake port.
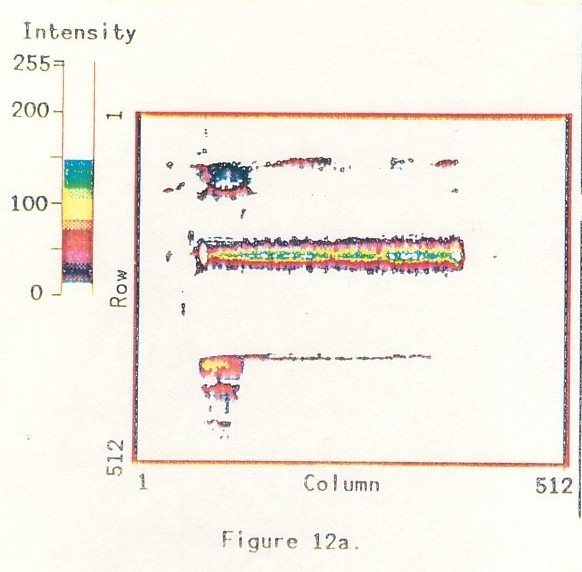
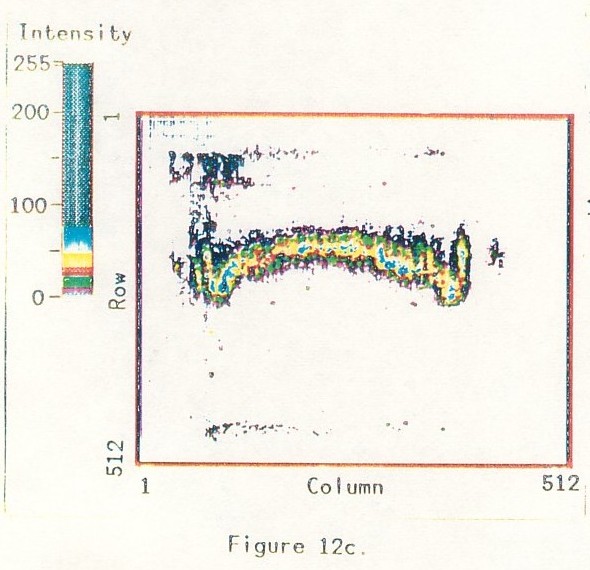
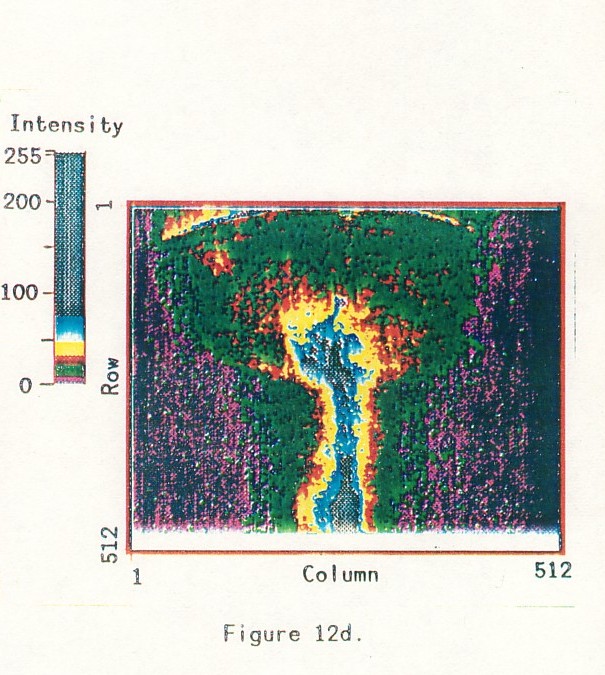
The diagnostic was set up with two cameras. One camera viewed the cylinder perpendicular to its axis as indicated in Figure 10. The view of the second camera is reproduced in Figure 10, except that the camera was mounted below the level of the piston top and looked up into the cylinder. There is only one pass of the beam through the cylinder. For the camera view noted in Figure 10, Figure 12a shows a false color image where the colors have been assigned to intensity levels as shown in the bar chart at the left of the image. The brightest part of the image is the laser beam excited phosphor particles shown in green and red. Background noise shows the image in the context of the engine geometry; the piston is clearly visible at the bottom, and the region of phosphor buildup between the highest ring travel and the top of the liner is shown.
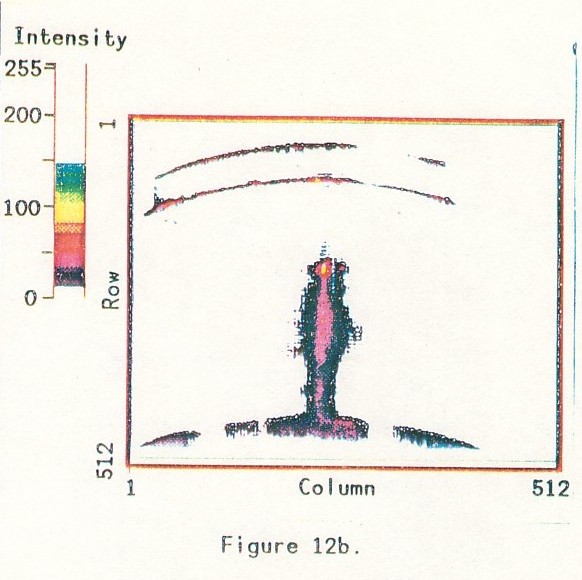
Figure 12a-b show the reference images of the laser beam geometry and the line at t=0 for the two cameras. In Figure 12a the camera was oriented as noted in Figure 10, and the entrance of the beam on the left and its exit on the right are the brightest spots, shown in yellow. The most intense part of the emission is from its center in this view (red) because that is the thickest part of a circular beam. The beam entrance, exit, and piston are seen because some of the phosphor particles are deposited on all of the surfaces inside the engine and excited by light from the beam. The reference images were taken at 500 r/min for an exposure time of 0.1 degrees, 0.1 degree after a laser pulse that occurred at 105 degrees crank angle after top dead center (ATDC). For this delay and exposure the flow has not moved since the much shorter laser pulse.
The second camera's view is shown in Figure 12b; taken from the orientation of Figure 10 but with the camera somewhat below the piston level looking upward into the head cavity. The top rim of the piston can be seen in the bottom of the image. At the top of the image are two arcs of phosphor powder built up on the wall of the cylinder. The top arc is at the joint between the cylinder and head, and the bottom arc indicates the point where the cylinder is not wiped clean by the ring motion. The beam enters at the top yellow dot and its exit lower down in the image is blocked from view by the piston.
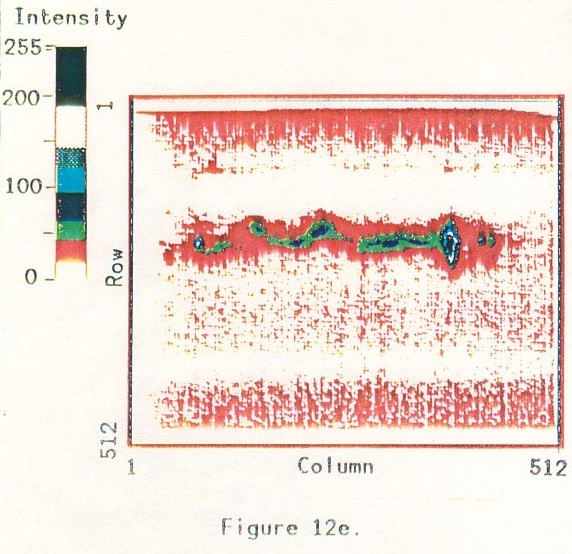
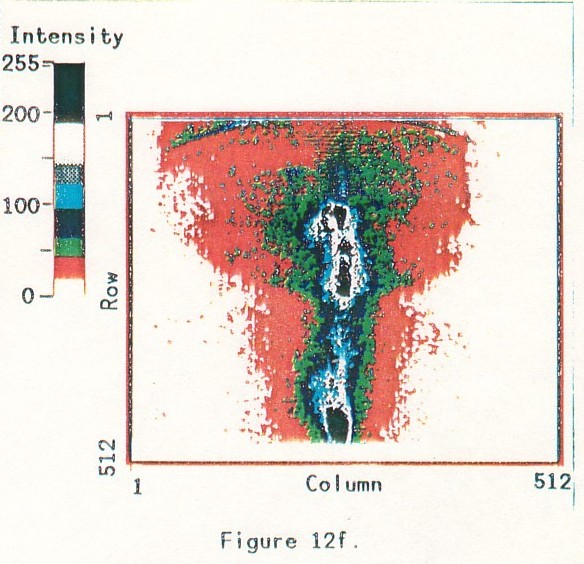
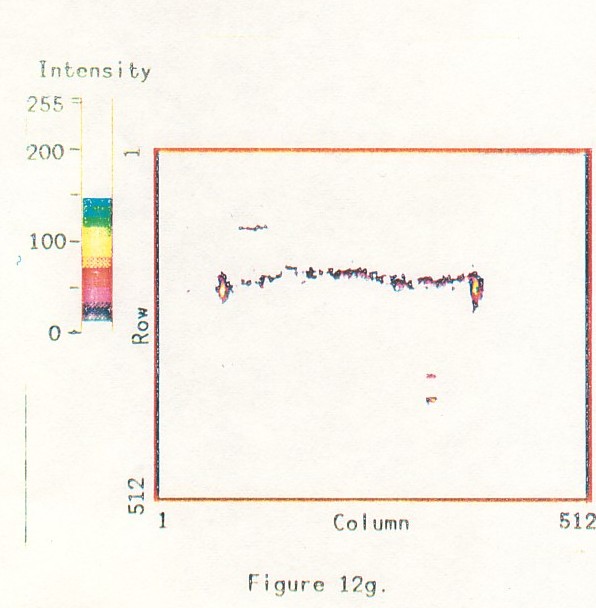
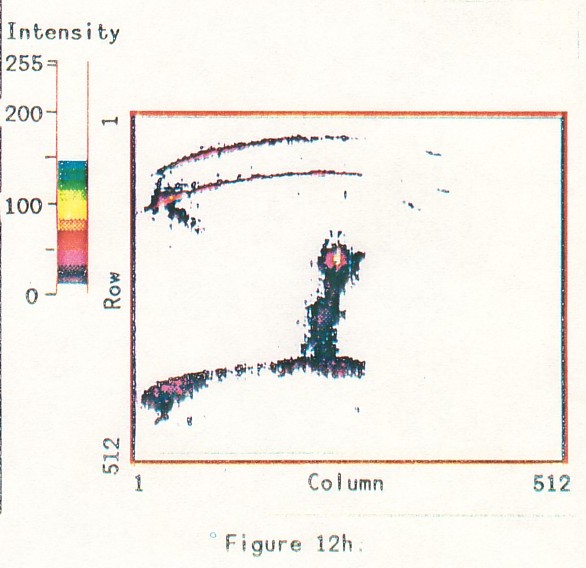
Figure 12c-h show the line displaced by the flow. The images are sets of two simultaneous views, all taken at 500 r/min with the cameras and beam at the same location. Figure 12c-d were taken at 160 degrees ATDC during the intake stroke. Using the laser firing time as a reference, Figure 12e-h were taken during the compression stroke, Figure 12e-f at 20 degrees after bottom-dead-center, and Figure 12g-h at 93 degrees ABDC. The two views are easily related by the beam entrance and exit spots on the liner in both images. The orthogonal camera setup clearly separates the three-dimensional motion. For these initial tests, the view through the piston top could not be used due to a layer of phosphor that had settled out over an extended period.
Various flow features can be identified in the data. Figure 12c shows that the intake flow in the cylinder is dominated by the conical intake jet coming out of the primary valve. The jet has turned down along the wall at the positions where it is intersected by the laser beam. The flow at the right has remained attached to the wall since its entry into the cylinder, so it is well defined and directed. The jet seen at the left has crossed the center of the cylinder at its top and has a considerable velocity component away from the camera that sees the view in Figure 12c. This flow is considerably more diffused, as would be expected. The central portion of the line also indicates some overall upward recirculation away from the piston.
Some statements can also be made about cycle-by-cycle variation from seven similar sets of intake data. While velocity magnitudes are repeatable, the direction of the left part of the jet (as seen in Figure 12c) varies between the case shown and nearly vertical, as might be expected for a flapping jet from the intake valve. The central recirulation decreases for cases in which the velocities are more vertically oriented
Figure 12e indicates that the flow at the beginning of the compression stoke is chaotic on large scales, apparently due to intake flow structures that are decaying. The motion is complex but tends to be upward away from the piston at the left of the view in Figure 12e. Figure 12f shows no well defined motion out of the plane of Figure 12e, but considerable small scale diffusive motion. Figure 12g confirms this view of the compression, but the non-uniformities have apparently died down leaving only the general motion. At this crank angle the motion seems to exhibit some clockwise tumbling. All of the line has been moved upward due to the overall compression by the piston. The view in Figure 12h shows that the tumbling motion has a component normal to the plane of the image in Figure 12g.
Approximate velocities can be calculated from these images. For the intake flow in Figure 12c-d, the maximum displacement of the line is about 12 mm and the time interval 2.1 degrees, or 0.7 ms at 500 r/min, so the peak velocities are approximately 17 m/sec. This compares to a mean piston speed of about 0.8 m/sec. For the compression data the displacement of the line is about 7 mm and the time interval 4.4 degrees or 1.45 ms at 500 r/min, so the peak velocities are approximately 17 m/sec. This compares to a mean piston speed of about 0.8 m/sec. For the compression data the displacement of the line is about 7 mm and the time interval 4.4 degrees or 1.45 ms at 500 r/min, thus, the peak velocities are close to 5 m/sec.
This data represents the beginning of efforts to map out the full-field flow in the cylinder. Time dependent data can be measured in one cycle since the diagnostic includes two lasers that can be pulsed with an arbitrarily short interval between them. The diagnostic, its application and the appropriate computer analysis and graphical display are under development.
Flame Images. Figure 13a-f show video images of combustion in the engine. This data was taken during the initial firing tests of the engine using a stainless steel liner at 500 r/min. Due to the mirror in the piston cutout, the combustion images are reversed from the view shown in Figure 3. The background of the head is shown in a drawing in Figure 13a and a crude outline of the cylinder is superimposed on the image.
Data were taken through the piston-top window with the camera set at minimum gain. These firing tests were conducted using indolene liquid fuel through the port fuel injectors that were built into the head. The spark was set at 42 degrees BTDC, and the engine was fired for 40 cycles at a time with 28 ms fuel injection pulses at 180 degrees BTDC. Flow and fuel injection were only through the primary valve, and the engine was operating with a nearly closed throttle.
As in the displaced line figures, the image intensity has been plotted in false colors as described by the bar chart at the left of the image. The vertical blurring seen in Figure 13a-d is due to saturation blooming along columns in the CCD array in the camera, and is not real. The images are slightly squashed in the vertical direction because the camera was not quite at right angles to the piston axis.
Figure 13a-c and 13d-f are two sequences of data taken with the video camera free-running. At 30 frames/sac between two and three frames will capture light from one engine cycle. Both of the sets of data presented here have been chosen because they have three images from one cycle.
The light emitted from combustion is of two basic types. Stoichiometric combustion results in a faint blue light as seen by the eye, whereas the areas of fuel rich combustion give off bright yellow light. For this reason, together with the lack of blue sensitivity of the camera, the data images show only fuel rich combustion, and probably the presence of liquid fuel.
All of the data show an intensity concentration around the primary intake, as would be expected. The only firing spark plug was directly below and to the right of the primary intake valve. Almost certainly, liquid fuel is carried into the cylinder off of the valve. It should be noted that steady state operation can only be achieved after three or four cycles of fuel injection, apparently due to a need to build up a layer of fuel an the walls in the port. Even an interruption of a small number of cycles after minutes of firing required these three or four cycles to again begin firing repeatedly. The inability to fire a small number of cycles implies that propane fuel must be used with the sapphire, at least for initial tests.
Two conclusions can readily be drawn, beyond the probability of liquid fuel in the cylinder. First, the combustion is very non-repeatable. Second, there is evidence of clockwise swirl in the views presented. This data is representative of many cycles of data in this respect. Combustion pressure traces did vary, but the pressure data were not correlated with the video frames.
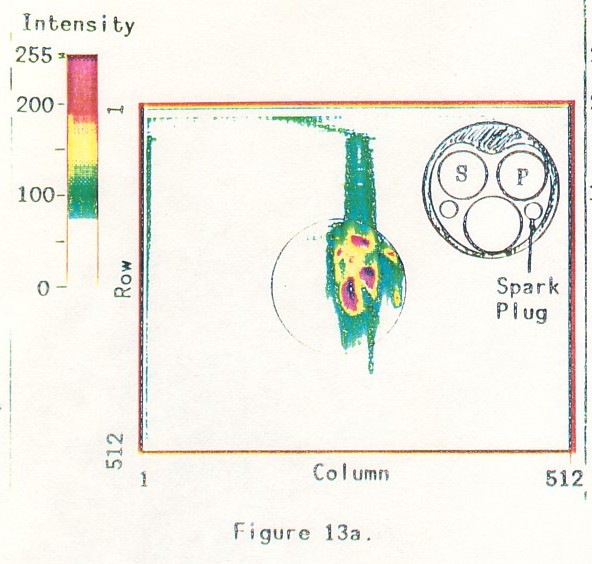
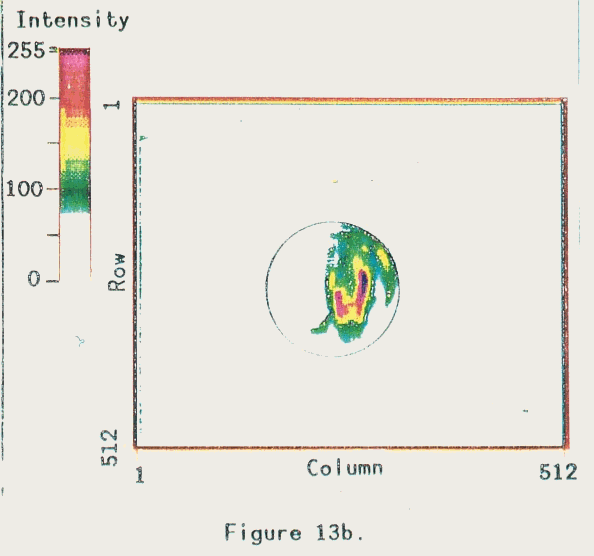
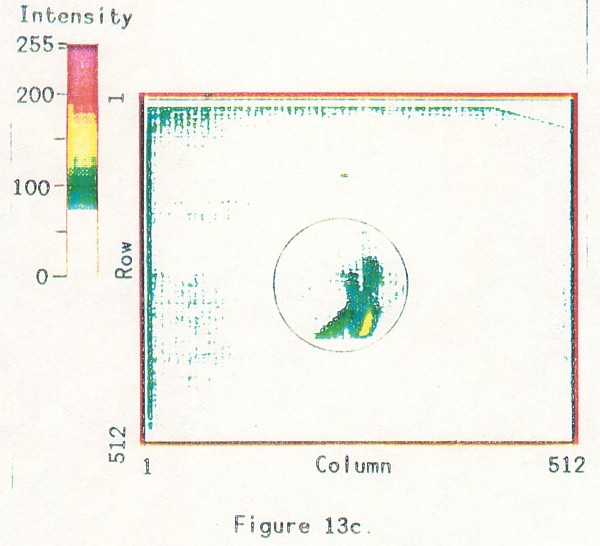
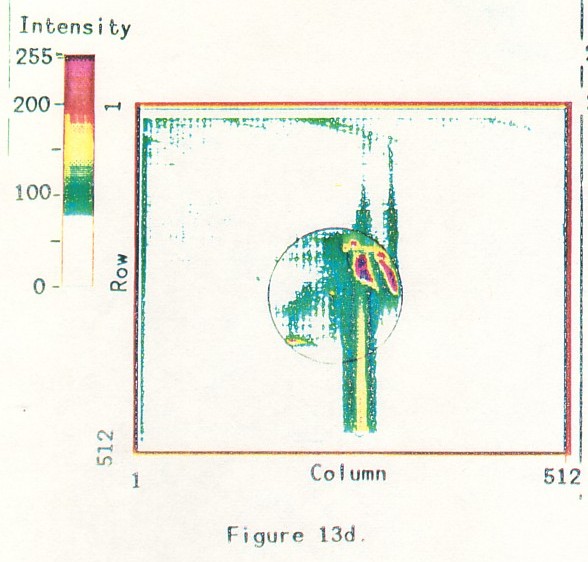
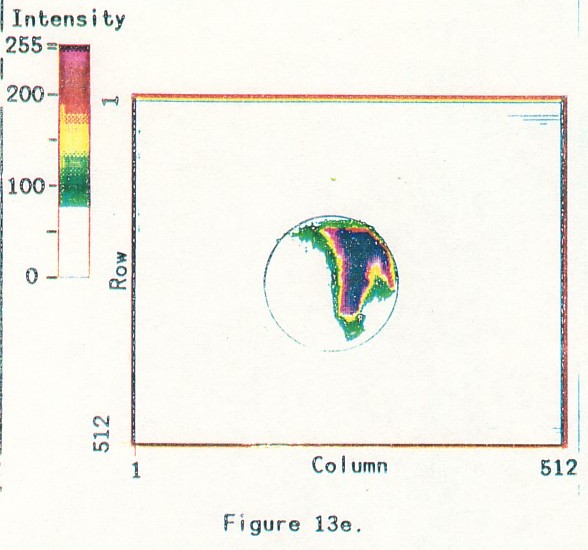
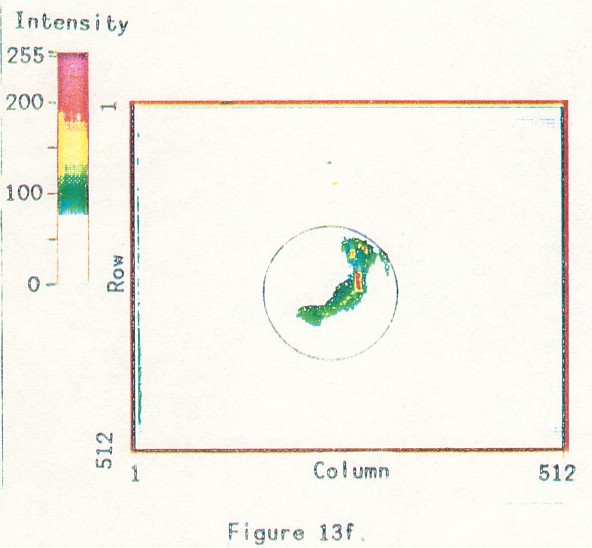
DISCUSSION
The visualization research engine has been built in an attempt to examine the fluid mechanics and combustion inside the cylinder of a spark-ignited engine. The engine was designed and operates as a research engine that realistically represents the geometry and operation of a current automobile engine. It is and must be a dependable test bed for diagnosing in-cylinder flows and for testing the diagnostics themselves.
The engine has been designed to provide optical access to investigate phenomena inside the cylinder. The access is total except from the top, where the necessity of a realistic head geometry precludes the use of transparent materials for a reasonable cost. The head also determines much of the flow geometry, so the option to use different heads must be a part of any research program. The advance in visualization capability with this engine is the degree of optical access in the context of a realistic engine, and especially this capability for a firing engine. Combustion has not yet been achieved in a real engine with a transparent circular liner. In the area of motoring research documented in the literature, there is little axial velocity data, little full-field flow data, and little cycle resolved data.
The design of the entire engine is dominated by the requirements for using a transparent liner. These constraints consist of an open and easily assembled structure, the ability to exploit the extensive optical access, and the mechanical design that will permit the liner to survive extended operation. The design must accommodate both the extreme hardness of the liner (by appropriate mounting structures) and thermal properties which can lead to large and destructive thermal stresses. Thermal stresses have been decreased by operating in a special manner; skip firing at high temperature with piston cooling. These are capabilities achieved by special thermal design features. Careful handling techniques are also required to enable a long lifetime for the liner.
The flow diagnostic that is being developed for the visualization engine derives velocity in the cylinder from images of the displacement of laser-marked lines. Although it works well enough for preliminary experiments, the technique is currently limited by seed density of the marked particles, shaping of the laser lines) and the noise of the whole system.
Important points should be made about the diagnostics video based imaging systems. The most valuable characteristic of video is its immediate output. This permits quick optimization of equipment parameters and makes the development of techniques like the one discussed here feasible on a short time scale. It also permits rapid scanning of experimental conditions to be able to take the best data possible in the minimum time. Furthermore) there are many commercial products available with a wide range of capabilities, including compatible, extensive, and inexpensive image processing systems.
That the flow being investigated is highly turbulent is crucial to both engine flow itself and the way in which it is studied. The geometry of the engine is very three-dimensional, and the flows are unsteady on time scales that are comparable with the turbulence scales. This fact confuses even the definition of turbulence) but it means that the flow is of necessity very complex both temporally and spatially. The thrust of the present work is to measure and understand the general features of the flow, rather than its details. This choice is reflected in the diagnostic, which is an inherently global tool that submerges fine detail in order to examine a continuous line across the cylinder.
A crucial area that will be addressed with this engine is the connection between the flow and flame behavior. This relationship determines the overall properties of combustion and the performance of the engine. Through stereo imaging, the three-dimensional behavior of the flame should be decipherable) and the velocity may be measurable through the flame and after the flame passes. There is, thus, the capability to measure both the flow and flame and to connect the two measurements. The ultimate goal is to connect the engine geometry and timing with combustion. Only recently have some of the links been formed) and most of this work describes ensembles of cycles.
In conclusion, a visualization engine with a transparent cylinder liner has been built and operated. It was specifically designed for optical diagnosis of the flow and flame in the cylinder under realistic engine conditions. The engine design has been discussed with an emphasis on the use of a sapphire liner for firing operation. Some different types of visualization work in the engine were described, as well as a diagnostic that is being developed to map the instantaneous three-dimensional velocity in the cylinder. The engine and diagnostics are a valuable tool for understanding the flow and combustion in the cylinder of an automotive engine.
ACKNOWLEDGMENTS. Kevin Rober was responsible for the early rapid progress on the engine by doing most of the detailed design and drawings for the project. Thanks are also due to Bob Bruck who contributed many answers and provided invaluable interfacing with the shop.
REFERENCES
1. R. B. Rask, "Laser Doppler Anemometer Measurements in an Internal Combustion Engine," SAE Paper 790094, 1979.
2. F. W. Bowditch, "A New Tool for Combustion Research - A Quartz Piston Engine," SAE Transactions, 69, 1961, pp. 17-23.
3. A. 0. zur Loye and F. V. Bracco, "Two-Dimensional Visualization of Premixed-Charge Flame Structure in an IC Engine," SAE Paper 870454, 1987.
4. S. C. Johnson, C. W. Robinson, W. S. Rorke, J. R. Smith, and P. 0. Witze, "Application of Laser Diagnostics to an Injected Engine," SAE Transactions, Vol. 92, 1983, pp. 786-796.
5. P. 0. Witze and T. M. Dyer, "Laser measurement techniques applied to turbulent combustion in piston engines," Experiments in Fluids, 4, 1986, pp. 81-92.
6. T. A. Baritaud and R. M. Green, *A 2-D Flame Visualization Technique Applied to the IC Engine," SAE Paper 860025, 1986.
7. M. Namazian, S. Hansen, E. Lyford-Pike, J. Sanchez-Barsse, J. Heywood, and J. Rife, "Schlieren Visualization of the Flow and Density Fields in the Cylinder of a Spark-Ignition Engine," SAE Paper 800044, 1980.
8. A. K. Oppenheim, R. K. Cheng, K. Teichman, 0. 1. Smith, R. F. Sawyer, K. Hom, and H. E. Stewart, "A Cimematographic Study of Combustion in an Enclosure Fitted with a Reciprocating Piston," Conference on Stratified Charge Engines, London, England, 1976.
9. A. P. Morse and J. H. Whitelaw, "Measurements of the In-Cylinder Flow of a Motored Four-Stroke Reciprocating Engine," Proc. Roy. Soc. A) 1981, pp, 309-377.
10. C. Arcoumanis, A. F. Bicen, A. P. Morse, and J. H. Whitelaw, "Measurements in a Motored Four-Stroke Reciprocating Engine," Journal of Fluids Engineering, 235, 1982, pp. 104-235.
11. C. Arcoumanis, A. F. Bicen, A. P. Morse, and J. H. Whitelawl "Effect of Inlet Parameters on the Flow Characteristics in a Four-Stroke Model Engine," SAE Paper 820750, 1982.
12. B. Khalighi and C. C. Jones, "Development of a Transient Water-Flow Model of an Engine for Flow Visualization," GM Research Laboratories Report FM-98, September 1986.
13. M. Davies, P. Li) T. Ma, K. A. Marko) and L. Rimai, OFlow Field Imaging for Quantitative Cycle Resolved Measurements in a Model Engine,w SAE Paper 860022, 1986.
14. N. Collings, M. Davies ' T. Ma., and K. A. Marko, "Low Speed Dynamic Similarity Modelling in Internal Combustion Engines," SAE Paper 860239) 1986.
15. K. A. Marko and L. Rimai, "Video recording and quantitative analysis of seed particle track images in unsteady flows," Applied Optics, Vol. 24, No. 21, 1, November 1985, pp. 3666-72.
16. R. M. Richman and W. C. Reynolds, "The Development of a Transparent Cylinder Engine for Piston Engine Fluid Mechanics Research," SAE Paper 840379, 1984.
17. H. J. Schock, C. A. Regan, and W. J. Rice, "Multicomponent Velocity Measurement in a Piston-Cylinder Configuration Using Laser Velocimetry," TSI Quarterly, Volume IX, No. 4, 1983, pp. 3-10.
18. L. M. Belyaev (Editor), Ruby and Sapphire, Nauka Publishers, Moscow) 1974, Available from National Technical Information Service, Springfield, Virginia, 22161.
19. H. P. Kirchner and J. M. Ragosta, "Crack Growth from Small Flaws in Larger Grains in Alumina," Journal American Ceramic Society, Vol. 63, No. 9-10, September-October 1980, pp. 490-495.
20. H. P. Kirchner, R. M. Gruver, and R. E. Walker, "Strengthening Sapphire by Compressive Surface Layers," Journal of Appliedg Physics, Vol. 40, No. 9, August 1969, pp. 3445-52.
21. R. L. Gentilman, E. A. Maguire, H. S. Starrett, T. M. Harnett, and H. P. Kirchner, "Strength and Transmittance of Sapphire and Strengthened Sapphire," Comm. of the Am. Chem. Soc., September 1981, pp. C-116,117.
22. R. Simon and R. L. Schmidt, "A System for Determining Fluid Properties Up To 136 MPa and 437K," Fluid Phase Equilibria, 10, 1983, pp. 233-248.
23. S. C. Bates, "A New Displaced-Line Velocity Diagnostic," GM Research Laboratories Report FM-113, April 1987.